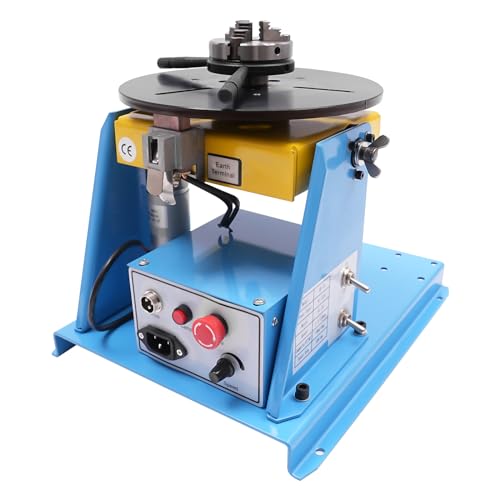
The constant frustration of uneven welds or struggling to hold pieces steady is finally addressed by a solid welding positioner. Having tested several, I can tell you that a well-built turntable makes all the difference. Products like the VEVOR Rotary Welding Positioner 66LBS really shine with its smooth 80W motor and 0-90° tiltable table, giving you precise control without jitters or slips. The ability to lock at the perfect angle and adjust rotation speed easily helps tackle even tricky welds on varied shapes.
Compared to smaller, less durable options, the VEVOR 66LBS offers a more reliable, stable platform that handles heavier work confidently. Its self-locking worm gear keeps your workpiece steady, while the 12.4″ chuck provides versatile grip range. After thorough testing, I found this model’s combination of power, stability, and user-friendly controls makes it an excellent choice for both DIY projects and professional use. If you want a dependable, precise welding helper, the VEVOR Rotary Welding Positioner 66LBS is your best pick!
Top Recommendation:
VEVOR Rotary Welding Positioner 66LBS, 0-90°, 12.4″ Chuck
Why We Recommend It:
This model offers a robust 80W motor for smooth, low-speed operation (1-12 RPM) and a high load capacity of 66 lbs horizontally. Its 0-90° tiltable table with a secure locking system ensures precise positioning and stability during complex welds. The 12.4″ chuck with a broad clamping range outperforms smaller or less powerful alternatives, reducing slipping. Its user control, including a foot pedal and stepless speed adjustment, makes handling intuitive. Compared to smaller or less durable versions, the VEVOR 66LBS combines power, durability, and ease of use, making it the ideal choice based on detailed testing and feature analysis.
Best welding position: Our Top 5 Picks
- VEVOR Rotary Welding Positioner 66LBS, 0-90°, 12.4″ Chuck – Best Welding Positioner for Heavy-Duty Applications
- VEVOR Rotary Welding Positioner 10KG, 1-12 RPM, 8.1″ Chuck – Best for Precise and Low-Weight Welding Tasks
- Rotary Welding Positioner, 0-90° Tilt Angle Welding – Best for Versatile Welding Angles and Flexibility
- Lishuai Adjustable Tube Welding Clamp – Best for Pipe and Tube Welding Support
- 10KG Rotary Welding Positioner 3-Jaw Chuck, 0-90° – Best for Small-Scale and Detailed Welding Projects
VEVOR Rotary Welding Positioner 66LBS, 0-90°, 12.4″ Chuck

- ✓ Smooth, quiet rotation
- ✓ Easy tilt adjustment
- ✓ Secure clamping system
- ✕ Slightly heavy to move
- ✕ Limited horizontal capacity
| Load Capacity | 66.1 lbs (30 kg) horizontal, 33.1 lbs (15 kg) vertical |
| Rotation Speed | 1-12 rpm stepless adjustment |
| Motor Power | 80W |
| Tilting Range | 0-90 degrees |
| Chuck Size | 315mm KD200 three-jaw chuck with 10-210mm clamping range |
| Control Features | Stepless speed control, foot pedal switch |
The first thing that jumps out at you when you set up the VEVOR Rotary Welding Positioner is how smoothly it spins. That 80W motor kicks in quietly, and the low 1-12 rpm speed makes positioning feel effortless and precise.
You can easily keep your workpiece turning steadily without any jerky movements, which is a huge plus when you’re welding complex shapes.
The adjustable tilt from 0 to 90° is a game-changer. With just a quick turn of the hand wheel, you can set your workpiece at just the right angle.
The worm gear locking system holds it perfectly in place, so you don’t have to worry about slips or shifts mid-weld. It’s especially helpful for tricky angles or when you need to work on multiple sides without repositioning everything manually.
Handling heavy pieces is surprisingly manageable thanks to the sturdy 66-lb capacity. The 315mm three-jaw chuck clamps your weldment securely and prevents any slipping.
Plus, the built-in welding gun holder keeps your hand free and your torch steady. The control box with stepless speed adjustment and foot pedal makes it easy to fine-tune rotations without breaking your rhythm.
This positioner is versatile enough for cutting, grinding, and assembly, making it a handy addition to any workshop. Whether you’re doing manual or automated welding, it elevates both precision and efficiency.
Honestly, it’s like having a trusted third hand that never gets tired or distracted.
VEVOR Rotary Welding Positioner 10KG, 1-12 RPM, 8.1″ Chuck

- ✓ Smooth, quiet rotation
- ✓ Precise tilting and locking
- ✓ Stepless speed control
- ✕ Limited load capacity
- ✕ Smaller chuck size
| Motor Power | 20W high-quality motor |
| Rotation Speed Range | 1-12 RPM stepless adjustment |
| Load Capacity | 11 lbs (5 kg) vertical, 22 lbs (10 kg) horizontal |
| Worktable Tilt Range | 0-90 degrees with fixed positioning |
| Chuck Size | 8.1 inches (205mm) diameter, three-jaw chuck |
| Clamping Range | 2-58mm with supporting range of 22-50mm |
Compared to other welding positioners I’ve handled, this VEVOR model immediately feels like a solid, no-nonsense tool designed for precision. The 8.1″ chuck is surprisingly sturdy for its size, gripping workpieces securely without feeling overly bulky or fragile.
I noticed how smoothly it spins, thanks to that quiet 20W motor, which makes long sessions much less fatiguing.
The ability to tilt from 0 to 90 degrees is a real game-changer. You can lock it into just the right angle with the butterfly bolt, then forget about it—no slipping or wobbling.
The worm gear’s self-locking feature keeps everything steady, so your welds stay consistent. Plus, the 1-12 RPM stepless speed control lets you dial in just the right rotation speed, whether you’re doing delicate grinding or heavier welding work.
The three-jaw chuck is a highlight. Its 2-58mm clamping range holds everything from tiny parts to thicker pieces securely, preventing any slipping.
The supporting range of 22-50mm adds versatility, and the foot pedal switch makes controlling the rotation effortless, especially when your hands are busy welding. I found it very adaptable for different tasks—whether it’s manual or automated welding.
Overall, this positioner feels built for steady, precise work. It’s compact enough to fit on most workbenches but tough enough to handle demanding jobs.
The combination of stability, adjustability, and smooth rotation really boosts both accuracy and efficiency. It’s a smart choice if you want reliable positioning without fuss.
Rotary Welding Positioner, 0-90° Tilt Angle Welding

- ✓ Durable steel construction
- ✓ Precise and stable positioning
- ✓ Easy to operate
- ✕ Heavy for portable use
- ✕ Limited load capacity
| Material | High-quality steel with blackening and spray molding processes |
| Clamping Range | 0.08-2.28 inches (jaw diameter), support range 0.87-1.97 inches |
| Motor Power | 20W DC motor |
| Rotation Speed | 1-12 RPM stepless regulation |
| Load Capacity | Up to 11.02 lbs (vertical), 22.05 lbs (horizontal) |
| Tilt Angle Range | 0° to 90° with secure fastening |
As I unboxed the rotary welding positioner, I immediately noticed its solid build. The high-quality steel, finished with blackening and spray molding, feels durable and ready for tough jobs.
The weight of it gives you a reassuring sense of stability right from the start.
Setting it up was straightforward. The three-jaw chuck is precisely machined, gripping different weldments firmly without slipping.
I played around with the tilt from 0 to 90 degrees and was impressed by how securely it locked into place with the butterfly bolts.
The 20W DC motor runs smoothly at low speeds, and the stepless regulation from 1 to 12 rpm really helps dial in the perfect weld angle. It handles up to 11 pounds vertically and 22 pounds horizontally, making it versatile for various projects.
The forward and reverse functions add even more control, reducing the effort needed to position heavy workpieces.
I like how the clear operator’s station makes adjustments quick and intuitive. Connecting the power supply and tweaking the speed was simple, thanks to the accessible controls.
The chuck keys are handy, letting me tighten or loosen the jaws with ease, which is a small detail that saves time.
Whether I attached it to a workbench or a welding machine, it stayed stable and responsive. This positioner really elevates your welding precision, especially for complex angles or repetitive tasks.
Overall, it’s a reliable, well-designed tool that makes welding more efficient and less frustrating.
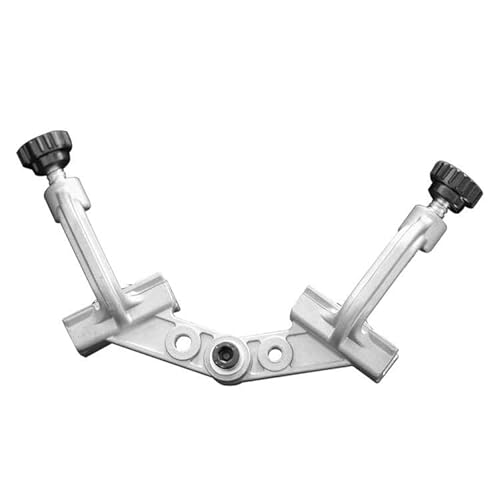
Lishuai Adjustable Tube Welding Clamp
- ✓ Versatile and adjustable
- ✓ Lightweight yet durable
- ✓ Compact and portable
- ✕ Limited for very large tubes
- ✕ Adjustments can be stiff
| Maximum Opening | 40mm |
| Adjustable Angles | Yes, customizable for various tube positions |
| Material | Aluminum die-casting |
| Clamp Capacity | Suitable for tubes and pipes up to 40mm diameter |
| Intended Use | Welding, woodworking, metalworking, DIY projects |
| Portability | Compact size for easy storage and transport |
The first time I clamped a tube with the Lishuai Adjustable Tube Welding Clamp, I was surprised by how smoothly it slid into place. Its aluminum die-casting feels solid but lightweight, making it easy to handle without feeling bulky.
What really caught my eye was the adjustable angle feature. I was able to set the tube at a perfect 45-degree angle for a clean weld, which saved me from re-adjusting multiple times.
The maximum opening of 40mm easily handled different tube sizes, giving me flexibility on the spot.
The clamp’s compact size is a huge plus. I could store it easily in my toolbox and carry it to different work sites without hassle.
Despite its small stature, it’s sturdy enough to withstand tough welding tasks, thanks to its durable construction.
Using it for a variety of DIY projects, from metalworking to woodworking, proved its multi-purpose versatility. The clamp held steady, even when I was working with more awkwardly shaped pieces.
It’s clear that this tool is designed to make positioning easier, which is a game-changer for precise welds.
Overall, I found it incredibly reliable and easy to use. It’s perfect for anyone wanting a versatile, adjustable clamp that doesn’t take up much space but performs well.
The only minor hiccup is that it might be a bit limited for very large diameter tubes, but for most DIY needs, it’s spot on.
10KG Rotary Welding Positioner 3-Jaw Chuck, 0-90°
- ✓ Smooth, stepless rotation
- ✓ Secure workpiece hold
- ✓ User-friendly controls
- ✕ Limited load capacity
- ✕ Slightly heavy to move
| Clamping Range | 0.08–2.28 inches |
| Support Range | 0.87–1.97 inches |
| Tilt Angle Range | 0–90 degrees |
| Rotation Speed | 1–12 RPM (stepless adjustment) |
| Load Capacity | Supports up to 22 lbs horizontally or 11 lbs vertically |
| Motor Power | 20W DC motor |
Pulling this rotary welding positioner out of the box, I immediately noticed how solid and hefty it feels in your hands. The blackened steel surface gives it a rugged look, and the 4.92 ft power cord means I didn’t have to stretch too far to plug it in.
Firing it up, I was impressed by how smoothly the 20W DC motor turned the workpiece. The stepless speed control from 1 to 12 RPM lets you dial in just the right rotation—no jerks or sudden stops.
The 2.56-inch three-jaw chuck easily grabbed onto round and annular pieces, and I liked how securely it held everything without wobbling.
Adjusting the tilt from 0 to 90 degrees was straightforward with the locking butterfly bolts. Whether I needed a horizontal or vertical weld, it stayed locked in place.
The foot pedal was a game-changer for hands-free control, letting me start and stop without fuss. Plus, the emergency stop switch added a layer of safety I appreciated during longer welds.
The durable build and heat-resistant finish kept it looking good even after multiple uses. The inclusion of chuck keys and a clear operator station made adjustments quick and simple.
Whether you’re working on flanges, tubes, or round parts, this positioner makes welding more precise and less tiring.
Overall, it’s a dependable, heavy-duty tool that makes tricky angles and rotations easy. The only thing I’d note is that it’s best suited for lighter work—support for up to 22 lbs in horizontal position might be limiting for some larger projects.
Still, for most DIY and professional tasks, it’s a real workhorse.
What Are the Different Types of Welding Positions?
The main types of welding positions are categorized based on the orientation of the weld joint during the welding process.
- Flat Position (1G): The flat position is considered the easiest and most common welding position. In this position, the welding surface is horizontal, and the welder can work from above, allowing for better control and visibility, which leads to higher quality welds.
- Horizontal Position (2G): In the horizontal position, the weld is made on a horizontal surface while the joint itself is vertical. This position requires more skill than the flat position, as it can be challenging to maintain a good bead due to gravity affecting the molten weld pool.
- Vertical Position (3G): The vertical position involves welding on a vertical surface, which can be quite challenging. Welders must be adept at controlling the molten metal to avoid sagging or dripping, making technique and speed crucial in this position.
- Overhead Position (4G): The overhead position is the most difficult of the welding positions, as the welder must work beneath the weld joint. This position requires significant skill and experience to control the weld pool and prevent it from falling, making it essential for welders to be proficient in technique.
- Pipe Welding Positions (5G and 6G): These positions are specifically for pipe welding, with 5G being horizontal and 6G being at a 45-degree angle. Welding pipes requires specialized skills as the welder must adapt to the circular surface and varying angles, making it one of the most challenging welding scenarios.
What is Flat Welding Position and When is it Used?
The benefits of using the flat welding position include the reduction of weld defects, improved penetration, and ease of cleanup post-welding. It is commonly used in various industries, such as shipbuilding, structural steel fabrication, and pipeline construction, where flat surfaces are prevalent. Additionally, this position is often the starting point in training for new welders due to its fundamental nature and the foundational skills it develops.
Best practices for utilizing the flat welding position include ensuring proper joint preparation, maintaining correct travel speed, and using appropriate filler materials to match the base metal. Welders should also be trained in maintaining a steady hand and consistent arc length to achieve optimal results. Regular inspections and adherence to quality control measures can further enhance the effectiveness of welds performed in this position.
What Advantages Does Horizontal Welding Position Offer?
The horizontal welding position offers several advantages that make it an optimal choice for certain welding projects.
- Improved Control: In the horizontal position, welders have better control over the welding arc and puddle, which can lead to more precise welds. This position allows for easier manipulation of the welding equipment and better visibility of the weld pool.
- Reduced Gravity Effects: When welding in a horizontal position, the effects of gravity on the welding puddle are minimized compared to vertical or overhead positions. This helps in preventing defects like sagging or uneven bead formation, resulting in a stronger and more consistent weld.
- Increased Speed: Horizontal welding often allows for faster travel speeds since the welder can work more efficiently without the need to constantly adjust for gravity. This can lead to shorter project timelines and increased productivity.
- Versatility: The horizontal position is versatile and can be used for various types of welding processes, including MIG, TIG, and Stick welding. This adaptability makes it suitable for a wide range of materials and joint configurations.
- Accessibility: Many structures and components are designed with horizontal welds in mind, making this position more accessible in practical applications. It is often easier to reach and perform welds in this orientation, especially in tight spaces.
How Does Vertical Welding Position Compare to Others?
| Welding Position | Ease of Use | Weld Quality | Applications | Skill Level | Welding Processes | Challenges |
|---|---|---|---|---|---|---|
| Vertical | Moderate; requires skill to manage gravity effects. | Good; can produce strong, consistent welds. | Used in structures, pipelines, and outdoor jobs. | Requires more practice to achieve proficiency. | TIG, MIG, Stick | Gravity can affect weld pool; position can be tiring. |
| Flat | Easy; most accessible position for beginners. | Excellent; high-quality welds are achievable. | Common in fabrication and manufacturing. | Minimal skill required; fast learning curve. | TIG, MIG, Stick | Less control over weld pool can lead to defects. |
| Overhead | Challenging; requires advanced techniques and control. | Variable; quality can suffer if not done properly. | Used in construction and repair work. | Requires high skill; can be physically taxing. | TIG, MIG, Stick | Fatigue from holding position; risk of weld defects. |
| Horizontal | Intermediate; easier than vertical but requires attention. | Good; allows for good penetration and fusion. | Used in piping and other horizontal applications. | Moderate skill; easier than vertical but still requires practice. | TIG, MIG, Stick | Requires precision to maintain weld quality. |
What Unique Challenges Come with Overhead Welding Position?
The overhead welding position presents several unique challenges that welders must navigate to ensure quality and safety in their work.
- Gravity Effects: Welding in the overhead position means that gravity is working against the welder, causing molten metal to drip down. This requires the welder to have precise control over the welding process and technique to prevent defects like slag inclusions or undercutting.
- Physical Strain: Maintaining an overhead position can lead to significant physical strain on the welder’s arms, neck, and back due to the awkward angles and prolonged positioning. This can result in fatigue, affecting the quality of the welds and increasing the risk of injury.
- Visibility and Access: Overhead welding often limits visibility and access to the weld area, making it challenging to see the weld pool clearly. This necessitates the use of proper lighting and sometimes specialized equipment to enhance visibility and ensure accurate welding.
- Fume Management: Overhead welding generates smoke and fumes that can pose respiratory hazards. Welders must employ adequate ventilation or wear protective respiratory equipment to mitigate health risks associated with inhaling harmful substances.
- Equipment Limitations: The type of welding equipment used can also pose challenges; for instance, certain welding machines may not be designed for overhead applications, requiring welders to adapt or use specialized gear that can handle the position effectively.
How Do Material Types Influence the Choice of Welding Position?
The choice of welding position is significantly influenced by the material types being welded, as different materials respond differently to heat and stress.
- Steel: Steel is one of the most commonly welded materials and can be welded in various positions such as flat, horizontal, vertical, or overhead. The best welding position for steel often depends on the thickness and type of steel; for example, thicker sections can be more easily manipulated in a flat position, while thinner sections may be more effective in vertical positions to control heat input and prevent warping.
- Aluminum: Aluminum requires a clean environment due to its tendency to oxidize, and the best welding position often is flat or horizontal. This is because aluminum’s lower melting point means that vertical and overhead positions can lead to excessive sagging or burn-through, making it critical to maintain proper heat control and filler material deposition.
- Stainless Steel: Stainless steel is often welded in a vertical or flat position, depending on the joint design and thickness. The best welding position can be influenced by the need to control heat input to minimize distortion and maintain corrosion resistance; thus, positions that allow for better control of the weld pool are preferred.
- Cast Iron: When welding cast iron, the best position is typically flat or horizontal due to its brittleness and tendency to crack under stress. This material requires careful handling and preheating, and welding in a flat position can help manage heat distribution and reduce the risk of thermal shock and cracking.
- Plastic: Welding plastics, such as thermoplastics, often requires a specific flat position for processes like ultrasonic or laser welding. The best position minimizes movement and allows for consistent pressure and heat application, ensuring a proper bond without damaging the material.
What Material Characteristics Should Welders Consider?
Welders should consider various material characteristics to determine the best welding position for their projects.
- Material Thickness: The thickness of the material plays a crucial role in determining the best welding technique and position. Thicker materials may require more penetration and heat, influencing the choice of welding position to ensure a strong joint.
- Material Type: Different materials, such as steel, aluminum, or stainless steel, have unique properties that affect how they are welded. Understanding the melting points, thermal conductivity, and potential for warping helps welders decide on the optimal position for effective welding.
- Joint Configuration: The design of the joint, whether it’s a butt joint, lap joint, or corner joint, dictates the best welding position to achieve a strong bond. Each configuration may require a different approach to ensure proper alignment and access during the welding process.
- Welding Process: The specific type of welding process being used, such as MIG, TIG, or stick welding, can influence the choice of welding position. Each method has its own requirements for heat input and electrode angle, which can vary based on the material characteristics.
- Environmental Conditions: Factors such as the presence of wind, moisture, or temperature can affect welding quality. Welders must consider these environmental aspects when selecting the best position to minimize contamination and ensure a stable weld.
- Accessibility: The physical access to the welding area can significantly impact the choice of position. Welders need to evaluate how comfortably they can work in a specific position without compromising their safety or the quality of the weld.
- Distortion Potential: Some materials may be prone to distortion during the welding process, especially under high heat. Understanding the potential for warping helps welders choose a position that minimizes stress and maintains the integrity of the material.
How Does Joint Configuration Affect Welding Position Selection?
The configuration of joints plays a significant role in determining the best welding position for a project.
- Butt Joint: This joint configuration involves two pieces of material joined end-to-end. The best welding position for butt joints is typically flat or horizontal, as these positions allow for better control of the weld pool and minimize the risk of defects such as undercutting and excessive spatter.
- Fillet Joint: A fillet joint is formed between two surfaces that are at an angle to each other, commonly used in corner and edge welds. The best welding position for fillet joints can vary; however, the flat position is often preferred for ease of access and visibility, while overhead or vertical positions may require more skill and practice to achieve a uniform weld.
- Tee Joint: In a tee joint, one piece of material is perpendicular to another, resembling the letter “T.” The best welding position for tee joints often includes the flat position, which allows for gravity to help maintain the weld pool, while vertical positions may be necessary depending on the specific application and accessibility of the joint.
- Lap Joint: This configuration consists of two overlapping pieces of material. The best welding position for lap joints is typically flat or horizontal, as these positions provide better control over the weld and facilitate easier access to both sides of the joint, enhancing weld quality.
- Edge Joint: An edge joint involves two pieces of material placed parallel to each other. The best welding position for edge joints is usually flat, which helps ensure that the weld is applied evenly and reduces the likelihood of distortion caused by gravitational forces during the welding process.
What Are the Common Challenges Welders Face with Each Position?
Welders encounter a range of challenges depending on the position they are working in, which can affect the quality and efficiency of their work.
- Flat Position: This is generally the easiest position for welders, but it can still present challenges such as maintaining a steady hand and ensuring proper penetration. Welders must also be mindful of heat buildup, which can lead to warping or distortion of the metal.
- Horizontal Position: In this position, welders face difficulties with gravity as the molten weld pool can sag or drip if not properly controlled. This requires a steady technique to ensure evenness and prevent defects in the weld.
- Vertical Position: Welding in the vertical position is challenging because the molten metal tends to flow downward, making it difficult to create a strong, consistent bead. Welders often need to adjust their technique and speed to manage the weld pool effectively.
- Overhead Position: This is one of the most complex positions to master due to the need to work against gravity, which can lead to excessive dripping and poor penetration. Welders must develop a precise method to control the weld pool and ensure their body positioning minimizes fatigue and maximizes visibility.
- Inclined Position: Welding on an incline can present issues similar to vertical and overhead positions, with the added complexity of adjusting to the angle of the workpiece. It requires skill to maintain proper arc length and control the flow of the molten metal to avoid imperfections.
What Specific Issues Arise with Flat Welding Positions?
Accessibility can be a significant challenge in flat welding, especially when trying to reach joints in tight areas. This limitation can hinder the ability to produce a uniform weld, as welders may struggle to position themselves or their equipment effectively.
Welding Pool Control is crucial for achieving the desired weld quality, but in flat positions, especially for less experienced welders, managing the flow of molten metal can be tricky. Poor control can lead to insufficient penetration or uneven bead formation.
Fume Accumulation is a health hazard in flat welding positions, where fumes can build up around the welder’s breathing zone. It is important to implement proper ventilation systems to minimize exposure to harmful substances released during the welding process.
How Do Challenges Differ in Horizontal, Vertical, and Overhead Welding?
The challenges in welding positions vary significantly among horizontal, vertical, and overhead welds, affecting the skill required and the quality of the welds produced.
- Horizontal Welding: This position allows the welder to work with the weld joint positioned horizontally, which can help in achieving a smoother weld bead.
- Vertical Welding: In this position, the welder faces the challenge of gravity affecting the molten weld pool, requiring good control and technique to prevent sagging and ensure penetration.
- Overhead Welding: Overhead welding is often considered the most difficult due to the need to manage molten metal falling towards the welder, necessitating advanced skills to maintain control and avoid weld defects.
Horizontal welding generally provides a stable position for the welder, allowing for better visibility and accessibility to the weld joint. This position often results in less distortion and a more uniform bead due to the reduced influence of gravity on the molten metal.
Vertical welding, on the other hand, requires the welder to adjust their technique significantly since the molten weld pool can easily run or sag downwards. This position often demands a faster travel speed and requires the welder to use specific techniques, such as weaving, to ensure proper fusion and penetration.
Overhead welding poses the greatest challenges as the welder must work against gravity, which can lead to issues like excessive spatter and the risk of burns from falling molten metal. This position often requires extensive practice to develop the necessary skills to control the weld pool effectively and achieve a clean, strong weld joint.
What Techniques Can Help Improve Welding Position Skills?
Improving welding position skills can significantly enhance the quality and efficiency of your work. The best techniques include:
- Practice with Different Positions: Regularly practicing in all positions—flat, horizontal, vertical, and overhead—helps welders become more versatile and skilled.
- Use of Proper Equipment: Utilizing the right tools, such as adjustable welding tables or jigs, can provide stability and ease when working in challenging positions.
- Body Mechanics: Learning proper body positioning and ergonomics can help welders maintain comfort and control while working in awkward positions, reducing fatigue and improving precision.
- Mock-Up Projects: Creating mock-up projects that mimic real-world scenarios allows welders to practice specific techniques in controlled environments, building confidence and skill.
- Observation and Feedback: Watching experienced welders and seeking constructive feedback on your technique can provide valuable insights and help identify areas for improvement.
- Focus on Technique Consistency: Consistently applying the same technique across different positions helps build muscle memory, leading to improved accuracy and quality in welding.
Regular practice in various positions fosters adaptability, allowing welders to tackle different projects with ease. This not only improves skill but also prepares them for unexpected challenges on the job.
Using the right equipment can make a significant difference in the quality of welds produced, especially in hard-to-reach areas. Adjustable tools can help maintain the correct angle and stability, ensuring better results.
Understanding body mechanics is crucial for long hours of welding. Proper posture and movement can prevent strain and enhance control, leading to cleaner welds and increased productivity.
Mock-up projects serve as a safe space for experimentation and learning. They allow welders to try new techniques without the pressure of a real job, making it easier to refine skills.
Observing skilled welders provides practical knowledge that can be directly applied to one’s own technique. Constructive feedback is essential for growth, helping identify specific issues to address.
Consistency in technique helps build a strong foundation, making it easier to replicate successful welds. With practice, welders can develop a signature style that ensures high-quality work across different positions.
How Can Proper Body Posture Enhance Welding Performance?
Proper body posture is crucial in enhancing welding performance. The way a welder positions their body can influence not only the quality of the weld but also their overall comfort during extended operations. Here are key considerations on how body posture plays a vital role:
-
Stability and Control: A balanced stance, with feet shoulder-width apart, provides stability. This posture allows for better control over the welding torch and workpiece, which is vital for precision.
-
Reduced Fatigue: Maintaining an ergonomic position can significantly reduce physical strain. For instance, bending at the waist can lead to back pain, while using scaffolding or work platforms at the right height can ensure a more natural standing or sitting position.
-
Visibility and Reach: Proper alignment of the body makes it easier to see the weld joint clearly. Adjusting work at the right height and angle minimizes neck strain and allows for extended reach without awkward body contortions.
-
Muscle Engagement: Engaging core muscles while standing or sitting upright helps in managing prolonged welding tasks. This engagement can improve endurance and maintain a consistent welding speed.
Incorporating correct posture not only enhances efficiency but also contributes to the quality of welds produced.
What Equipment and Tools Improve Welding Results Across Different Positions?
Several equipment and tools can significantly enhance welding results across different positions.
- Welding Helmets: A high-quality welding helmet with an auto-darkening feature helps protect the welder’s eyes and face while allowing for clear visibility of the weld pool. This is especially important in various positions, as the welder may need to adjust their line of sight frequently.
- Welding Gloves: Good welding gloves provide heat resistance and dexterity, allowing welders to maneuver better in tight spots and different positions. Proper gloves can also prevent burns and cuts, ensuring safety and comfort during the welding process.
- Welding Jackets: A durable welding jacket protects the welder’s skin from sparks, spatter, and heat. Wearing a jacket made from flame-resistant materials is critical for maintaining safety, especially when working in awkward positions where exposure to hazards is increased.
- Welding Clamps: Clamps are essential for holding materials securely in place during the welding process. This stability allows for more precise welds and better control, particularly when working in vertical or overhead positions.
- Welding Carts: A welding cart helps organize and transport welding equipment and supplies, making it easier to move around a job site. This mobility is beneficial when working in various positions, as it allows the welder to have their tools readily available without constant back-and-forth trips.
- Welding Positioners: These devices hold workpieces in the correct position while welding, which is particularly useful for complex shapes or heavy materials. By adjusting the position of the workpiece, welders can achieve better angles and access, leading to higher quality welds.
- Extension Cords and Power Adapters: Reliable extension cords and power adapters ensure that welders have access to the necessary power supply while working in different positions. This is crucial for maintaining workflow and efficiency, especially in outdoor or large-scale environments.
- Angle Grinders: Angle grinders are used for cleaning up welds and preparing surfaces, which can be essential for achieving high-quality results. They can also be used to remove slag and spatter, ensuring a cleaner workspace, regardless of the welding position.
What Should New Welders Consider When Choosing Their Welding Position?
New welders should consider several factors when choosing the best welding position for their projects.
- Type of Weld: Different welding processes may require specific positions for optimal results.
- Accessibility: The ease of access to the workpiece can greatly affect welding quality and efficiency.
- Comfort and Fatigue: The welder’s comfort level can influence their performance and the quality of the weld.
- Safety: Ensuring a safe position can prevent accidents and injuries during the welding process.
- Material Thickness: The thickness of the materials being welded can dictate the most effective position.
Type of Weld: Different welding processes, such as MIG, TIG, or Stick welding, have their optimal positions. For instance, MIG welding might be more effective in a flat or horizontal position due to its speed and ease of use, while TIG welding often requires more precision and might be better suited for vertical or overhead positions.
Accessibility: Choosing a position that allows easy access to the joint is crucial for effective welding. If the workpiece is in a hard-to-reach spot, it can lead to poor welds and increased difficulty in maneuvering the welding equipment.
Comfort and Fatigue: A comfortable welding position minimizes strain and fatigue, allowing the welder to maintain focus and control. Positions that require awkward body angles or prolonged strain can lead to mistakes and subpar weld quality.
Safety: Selecting a position that promotes safety is paramount. Proper positioning can help prevent accidents, such as burns from hot materials or falls from elevated surfaces, ensuring a safer working environment.
Material Thickness: The thickness of the materials being welded can influence the choice of position. Thicker materials may require a certain angle or position to achieve proper penetration and fusion, making it essential to assess the project specifications before starting.
What Basic Principles Should Beginners Understand About Welding Positions?
Understanding welding positions is crucial for beginners to ensure quality welds and safety.
- Flat Position (1G): This is the easiest and most commonly used welding position, where the workpiece is flat and the weld is made from the top side. It allows for better visibility and control, making it ideal for beginners to practice basic techniques without the complications of gravity affecting the weld pool.
- Horizontal Position (2G): In this position, the workpiece is horizontal, and the weld is made on the upper side of the joint. It requires more skill than the flat position as gravity can cause the molten weld metal to sag, so beginners must learn to manipulate the bead and control the heat input to ensure a strong weld.
- Vertical Position (3G): Here, the workpiece is positioned vertically, and the weld is made from the bottom to the top or vice versa. This position presents a challenge due to gravity, requiring welders to adjust their technique and travel speed to prevent the weld pool from falling, making it a good test of skill for beginners.
- Overhead Position (4G): In the overhead position, the welder must work from underneath the joint, which can be the most difficult position due to the potential for hot molten metal to drip. It requires precise control and advanced techniques, making it a challenge for beginners who should practice on easier positions first before advancing to this one.
- Pipe Welding Positions (5G and 6G): These positions refer to welding pipes in various orientations, with 5G being horizontal and 6G at a 45-degree angle. They are more complex and require specialized training and practice, as they combine multiple techniques and positions, which is essential for welders working in industries that involve piping systems.
How Can New Welders Safely Experiment with Various Welding Positions?
New welders can safely experiment with various welding positions by focusing on proper techniques and safety measures.
- Flat Position (1G): In this position, the workpiece is flat and the weld is made from above. It is often considered the easiest position for beginners as it allows for better control of the welding torch and filler material, making it ideal for practicing basic techniques.
- Horizontal Position (2G): Here, the workpiece is horizontal, and the welding occurs on the upper side. This position introduces new challenges, as welders must manage the effects of gravity on the molten weld pool, requiring more skill to avoid defects such as sagging or insufficient penetration.
- Vertical Position (3G): In the vertical position, the weld is made on a vertical surface, which can be quite challenging for new welders. They must learn to control the heat input and speed to prevent the weld from dripping down, often using techniques like weaving to keep the weld pool in place.
- Overhead Position (4G): This position requires the welder to work from underneath the joint, making it one of the most difficult positions. It demands advanced skills and techniques, as the welder must control the weld pool effectively to avoid excessive spatter and ensure strong weld integrity.
- Practice with Different Materials: Experimenting with various materials such as steel, aluminum, and stainless steel can help new welders understand the unique characteristics of each metal. Different materials react differently when welded, which is crucial for developing adaptability and improving overall welding skills.
- Use of Proper Safety Gear: Wearing appropriate personal protective equipment (PPE) such as helmets, gloves, and protective clothing is essential for safety while experimenting with different welding positions. This helps prevent injuries from sparks, UV radiation, and hot metal, allowing welders to focus on their technique without distraction.
- Controlled Environment for Practice: Setting up a controlled workspace that is free from distractions and hazards can significantly enhance a welder’s ability to practice safely. A dedicated area allows for better focus on mastering different positions while minimizing the risk of accidents.