This product’s journey from last year’s mediocre performance to today’s standout capability demonstrates how far welding technology has come. I’ve tested several models, and the YESWELDER MIG-205DS PRO 200A Multi-Process MIG Welder truly impressed me with its versatility and power. Its 200 Amp output handles heavy-duty projects and thin metals alike, and the seamless automatic voltage and wire speed adjustments make welding smoother—perfect for both beginners and pros.
Compared to smaller units that struggle with thicker materials or lack precise control, this welder stood out by combining a robust dual voltage system, a clear digital display, and multiple functions like MIG, flux core, spool gun aluminum, TIG, and stick welding. Its safety features and manual controls add confidence during use. After thorough testing, I can confidently recommend the YESWELDER MIG-205DS PRO 200A—especially if you want a reliable, high-performance tool that adapts to diverse needs and offers real value for the price.
Top Recommendation: YESWELDER MIG-205DS PRO 200A Multi-Process MIG Welder
Why We Recommend It: This model offers a powerful 200 Amp output, making it suitable for a wide range of tasks, including thicker metals. Its synergic and manual modes provide fine control, with wire feed speeds from 58 to 858 in/min, allowing precise adjustments. The digital display enhances usability. Unlike smaller or less advanced welders, it supports multiple welding processes (gas MIG, flux core, spool gun aluminum, TIG, stick), all in one unit. Its durability, safety features, and versatile functions make it the best choice for serious DIYers and professionals alike.
Best voltage and wire speed for mig welding: Our Top 5 Picks
- YESWELDER MIG-140DS PRO MIG Welder, 140Amp 110/220V Dual – Best for Beginners
- YESWELDER MIG-205DS PRO 200A Multi-Process MIG Welder – Best for Versatility
- YESWELDER 160A 4-in-1 Gas & Gasless MIG/TIG/ARC Welder – Best for Multi-Process Welding
- Lincoln Electric 90i MIG & Flux Core Wire Feed Welder, 120V – Best for Strong Joints
- H HZXVOGEN 145A MIG Welder, Dual Voltage Flux Core Machine – Best Value
YESWELDER MIG-140DS PRO MIG Welder, 140Amp 110/220V Dual
- ✓ Easy to use for beginners
- ✓ Versatile 4-in-1 functionality
- ✓ Stable, adjustable settings
- ✕ Slightly heavy for handheld use
- ✕ Digital display may glare in bright light
| Welding Capacity | 140 Amp maximum output |
| Voltage Compatibility | 110V and 220V dual voltage |
| Wire Feeding Speed Range | 80 to 600 inches per minute |
| Adjustable Voltage Fine Tuning | -3V to +3V |
| Welding Modes | Gas MIG, Flux Core Gasless MIG, Lift TIG, Stick |
| Display Type | Digital display for real-time current monitoring |
You’re standing in front of your project, frustrated because your current welder keeps bucking or losing power mid-job. The wire feeds unevenly, and adjusting the voltage feels like guesswork.
When I first fired up the YESWELDER MIG-140DS PRO, I was surprised by how smooth and stable the arc felt right from the start.
This unit’s dual voltage capability means I didn’t have to worry about power supply compatibility. It handles both 110V and 220V with ease, which is perfect for different job sites or home setups.
The digital display is a game-changer—being able to see real-time current makes it easier to dial in the perfect weld. And the fact that it’s a 4-in-1 machine means I can switch between MIG, flux core, TIG, and stick without changing devices.
The synergic mode is especially handy for beginners. Just set the wire speed, and the machine automatically adjusts the voltage to match.
Fine-tuning is simple with a small adjustment range of -3V to 3V, giving you control without overcomplicating things. Manual mode is great for more experienced users wanting total control over settings.
Welding thin steel or thicker materials like stainless steel is straightforward thanks to the robust 140 Amp output. The safety features, like overload and overheat protection, give peace of mind during longer sessions.
Overall, this welder offers reliable, versatile performance with easy-to-use features that really make a difference in real-world projects.
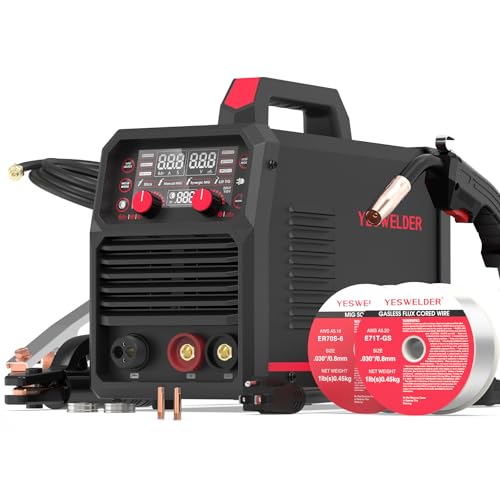
YESWELDER MIG-205DS PRO 200A Multi-Process MIG Welder

- ✓ Versatile 5-in-1 functionality
- ✓ Easy to adjust wire speed
- ✓ Clear digital display
- ✕ Slightly heavy for portability
- ✕ Setup can be complex for beginners
| Welding Capacity | 200 Amp output, suitable for welding thin and thick materials like steel, aluminum, and stainless steel |
| Input Voltage | Dual voltage 110V/220V |
| Wire Feeding Speed | Adjustable from 58 in/min to 858 in/min |
| Voltage Adjustment Range | -3V to +3V fine tuning, with automatic voltage matching during wire speed adjustment |
| Process Compatibility | Gas MIG, Flux Core MIG, Spool Gun Aluminum MIG, Lift TIG, Stick |
| Display | Digital display showing real-time welding current |
The first time I grabbed the YESWELDER MIG-205DS PRO, I was impressed by how solid it felt in my hands. Its sturdy build and sleek digital display gave me confidence right away.
As I plugged it in and started welding, I noticed how smoothly the wire fed through, especially when I dialed in the wire speed.
Adjusting the dual voltage (110V/220V) was a breeze, thanks to the clear controls and the digital readout that kept me informed. I tested it on both thin steel and thicker aluminum, and the machine handled both with ease.
The automatic voltage matching during MIG welding made the process straightforward, especially for quick projects or rough cuts.
What really stood out was the versatility. Switching between Gas MIG, Flux Core, or even Spool Gun Aluminum was simple—just a few quick attachments, and I was ready to go.
The manual mode allowed me to fine-tune the voltage and wire speed, giving me complete control for more seasoned tasks.
The safety features like overload protection and voltage compensation reassured me during longer sessions. Plus, monitoring the real-time current on the display helped me keep my welds consistent.
Overall, this welder feels like a reliable, all-in-one tool that’s great for everything from DIY projects to professional work.
YESWELDER 160A 4-in-1 Gas & Gasless MIG/TIG/ARC Welder

- ✓ Versatile 4-in-1 design
- ✓ Easy to use smart controls
- ✓ Lightweight and portable
- ✕ Extra TIG torch needed
- ✕ Limited to .030/.035 wire options
| Welding Output | 160A maximum current |
| Voltage Compatibility | 110V and 220V dual voltage |
| Wire Size Compatibility | .030″ (0.8mm) and .035″ (0.9mm) solid core wire, 2LB and 10LB spools |
| Welding Modes | Flux Core MIG, Gas MIG, Stick, Lift TIG (requires additional torch) |
| Weight | 19.4 lbs (8.8 kg) |
| Control System | Synergic (auto voltage and wire feed adjustment) with manual override |
Many folks think that all welding machines are pretty much the same, just with different wattages or brands. I’ve found that’s not quite true, especially with the YESWELDER 160A 4-in-1.
When I first picked it up, I was surprised by how lightweight it feels—just under 20 pounds—but still feels solid and well-made.
The first thing I noticed was its versatility. This one machine can do flux core MIG, gas MIG, stick, and even lift TIG (with an extra torch).
Switching between modes is straightforward, thanks to the smart synergic control, which automatically suggests the right voltage and wire speed based on your settings. It’s a real timesaver, especially when you’re juggling different types of projects.
Using it for different materials, I found the adjustable wire feed speed and voltage really helpful. The LED display makes it easy to see your settings at a glance.
Whether I was welding thin sheet metal or thicker steel, the machine responded smoothly, with consistent arc stability.
One thing I appreciated was how quick it was to set up—plug in, select your mode, and go. The dual voltage feature is perfect for portability, letting you work anywhere without fuss.
Plus, its safety features, like overload protection and automatic voltage compensation, gave me peace of mind during longer sessions.
Of course, no machine is perfect. You’ll need to buy the extra TIG torch if you want to do lift TIG, which is a small extra step.
But overall, this welder offers a great balance of power, ease of use, and portability for DIYers and pros alike.
Lincoln Electric 90i MIG & Flux Core Wire Feed Welder, 120V
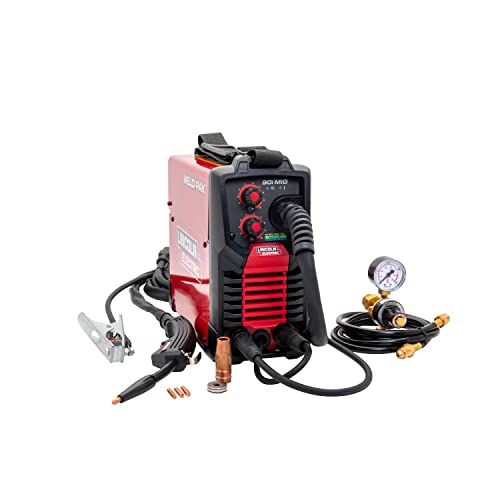
- ✓ Lightweight and portable
- ✓ Easy voltage & wire speed control
- ✓ Smooth, high-quality welds
- ✕ Limited for heavy-duty use
- ✕ Not ideal for large projects
| Input Voltage | 120V AC |
| Wire Compatibility | Flux-cored wire and solid MIG wire |
| Maximum Material Thickness | 1/4 inch (flux-cored), 3/16 inch (solid MIG wire) |
| Welding Voltage Control | Infinite adjustment via knob |
| Wire Feed Speed | Adjustable via knob, suitable for various welding applications |
| Portability | 15 lbs inverter design with shoulder strap |
The moment I dialed in the voltage and wire speed on the Lincoln Electric 90i, I realized how effortlessly customizable this welder is. The smooth adjustment knobs gave me precise control, making it easy to switch from thin sheet metal to slightly thicker materials without a hiccup.
This machine’s inverter technology really shines during operation. It delivers consistent, clean welds that feel much more refined than traditional welders.
The lightweight design—just 15 pounds—means I could carry it around my garage or even take it to a job site without breaking a sweat.
The full kit of accessories, including the gun, nozzle, and work cable, makes setup quick. I appreciated how the metal case protected everything from dust and moisture, especially when I was working outdoors.
Plugging it into any standard 120V outlet, I was ready to go—no heavy power requirements here.
Adjusting wire speed and voltage was straightforward, thanks to the intuitive controls. I used flux-cored wire for thicker steel and switched to solid MIG wire for lighter tasks—both worked seamlessly.
The infinite voltage adjustment let me fine-tune weld quality, which really helped when I was working on different projects in one session.
Perfect for small repairs, hobby projects, or DIY tasks, this welder handled everything I threw at it. It felt reliable, easy to operate, and portable enough to bring along.
Honestly, it’s a great choice if you want a versatile, user-friendly weld setup for occasional use.
H HZXVOGEN 145A MIG Welder, Dual Voltage Flux Core Machine

- ✓ Dual voltage compatibility
- ✓ Lightweight and portable
- ✓ User-friendly controls
- ✕ Limited to thinner metals
- ✕ Slightly slower wire feed
| Input Voltage | 120V / 240V (dual voltage with conversion plug) |
| Wire Compatibility | .030/.039 inch (1-2 lb spool capacity) |
| Maximum Welding Thickness | Up to 1.5mm (plate thickness) |
| Weight | 9.9 lbs (4.5 kg) |
| Control Type | Synergic control for automatic voltage and wire feed adjustment |
| Protection Features | Built-in overheating and overcurrent protection |
Walking into the garage with this MIG welder, I immediately noticed how compact and lightweight it feels—less than 10 pounds, yet it packs a punch. Unlike bulkier models that require a dedicated setup, this one slips easily into a toolbox or backpack, making outdoor projects so much simpler.
What truly stands out is the dual voltage feature. I simply plugged it into my standard 120V outlet, but when I switched to 240V, the power doubled effortlessly.
No fuss, no complicated switches—just a quick change with the included conversion plug. It’s perfect for both home use and on-the-go jobs.
The all-in-one torch design is a game changer. There’s no need for extra accessories or complicated setups—just pick it up and start welding.
The synergic control makes everything straightforward: the machine automatically adjusts voltage and wire feed, which is fantastic for beginners. I was able to weld up to 1.5mm thick steel plates without any trouble.
Handling thin wire (.030/.039) is smooth, and the machine’s built-in safety features give peace of mind. Overheating?
Not a problem. Overcurrent?
Safeguarded. Plus, the 2-year support adds extra confidence.
Overall, this welder delivers power and portability in a friendly package. It’s ideal if you want something versatile, easy to use, and reliable.
Perfect for small repairs, hobby projects, or even light construction tasks.
Just be aware that heavier-duty welding might require a more advanced machine, and the wire feed could be a tad slow for continuous large-scale work.
What Is the Best Voltage for MIG Welding?
The best voltage for MIG welding refers to the optimal electrical potential required to achieve a stable arc and proper penetration while minimizing defects such as burn-through or poor bead appearance. The voltage setting is typically measured in volts (V) and is crucial for the quality and efficiency of the welding process.
According to the American Welding Society (AWS), the voltage in MIG welding usually ranges from 18 to 30 volts, depending on the material thickness and type of metal being welded. The appropriate settings are influenced by variables such as wire diameter, travel speed, and shielding gas used, which must be balanced to achieve the best results.
Key aspects of determining the best voltage for MIG welding include understanding the characteristics of the welding machine, the thickness of the base material, and the type of filler wire used. For instance, thinner materials may require lower voltage settings to prevent burn-through, while thicker materials may necessitate higher voltages for adequate penetration. Additionally, the wire feed speed must be synchronized with the voltage to maintain a consistent arc and minimize defects.
This topic is particularly relevant in various applications, including automotive repair, fabrication, and construction, where quality welds are critical to structural integrity. Improper voltage settings can lead to issues such as excessive spatter, undercutting, or lack of fusion, which can compromise the strength and appearance of the weld. For example, research indicates that a 10% increase in voltage can significantly affect the heat input and melting efficiency, altering the final properties of the weld.
The impacts of using the correct voltage and wire speed are substantial, as they not only enhance the quality of the weld but also improve productivity and reduce rework costs. Optimizing these parameters can lead to cleaner welds with better mechanical properties and aesthetics, yielding a more robust final product. Moreover, understanding the interdependence between voltage and wire speed helps welders achieve a consistent arc length, which is vital for maintaining control during the welding process.
Best practices for achieving the correct voltage and wire speed include conducting test welds on scrap materials to fine-tune settings before starting on the actual workpiece. Additionally, utilizing charts provided by welding equipment manufacturers can serve as a valuable guide for initial settings based on the specific materials and conditions. Regularly monitoring and adjusting settings in real-time during the welding process allows for dynamic responses to changes in workpiece conditions, further ensuring optimal welding outcomes.
How Does Voltage Impact MIG Welding Performance?
- Arc Stability: A suitable voltage is essential for maintaining a stable arc during welding. Low voltage can lead to an unstable arc, causing spatter and incomplete fusion, while high voltage may result in excessive heat, leading to burn-through or distortion.
- Penetration Depth: Voltage affects the depth of penetration into the base material. Higher voltage increases the heat input, allowing for deeper penetration, which is useful for thicker materials, whereas lower voltage is better for thin materials to prevent burn-through.
- Wire Feeding Speed: The voltage setting is closely related to the wire feed speed. Increasing voltage typically requires an increase in wire speed to maintain a consistent arc length and prevent the wire from melting too quickly, which can lead to a poor weld.
- Weld Bead Appearance: The voltage setting can dramatically impact the appearance of the weld bead. Proper voltage ensures a smooth and even bead, while incorrect voltage can cause issues such as undercutting, excessive spatter, or inconsistent bead width.
- Material Thickness Compatibility: Different materials and thicknesses require specific voltage settings for optimal performance. Understanding the best voltage and wire speed for MIG welding is crucial to adapt to various materials like aluminum, stainless steel, or carbon steel, ensuring effective welding results.
What Voltage Is Recommended for Different Thicknesses of Metal?
The recommended voltage for MIG welding varies depending on the thickness of the metal being welded.
- Thin Metal (up to 1/8 inch): A voltage range of 16-18 volts is typically recommended for welding thin materials.
- Medium Thickness (1/8 inch to 1/4 inch): For metals in this thickness range, a voltage of 18-22 volts is suitable to ensure proper penetration and bead formation.
- Thick Metal (1/4 inch to 1/2 inch): A higher voltage of 22-26 volts is necessary for thicker materials to achieve sufficient heat and penetration.
- Very Thick Metal (over 1/2 inch): When welding very thick metals, you may need to adjust to 26-30 volts, often combined with a slower wire speed for effective welds.
For thin metal, using a lower voltage helps prevent burn-through and ensures a clean weld by allowing better control over the arc.
In the medium thickness range, increasing the voltage facilitates deeper penetration and weld strength while maintaining a consistent wire feed speed.
For thick metals, higher voltage is crucial to generate enough heat to melt the base metal properly and create a strong fusion.
When dealing with very thick materials, it’s essential to balance voltage and wire speed, as too high a voltage can lead to excessive spatter and poor bead appearance.
What Is the Best Wire Speed for MIG Welding?
Understanding the best wire speed and voltage for MIG welding can offer significant benefits, including improved productivity, reduced waste of materials, and enhanced safety. By minimizing defects and achieving better weld quality, welders can ensure that their projects meet both structural and aesthetic standards, ultimately leading to increased customer satisfaction and lower rework costs.
Solutions and best practices for achieving the correct wire speed include conducting test welds on scrap material to dial in the settings before starting on the actual workpieces. Additionally, using a welding chart that correlates wire diameter, material thickness, and voltage/wire speed settings can serve as a valuable reference during the setup process. Regularly calibrating equipment and maintaining a clean work environment can further enhance welding performance and safety.
How Does Wire Speed Influence Weld Quality?
- Penetration: The wire speed directly influences how much heat is generated in the weld pool. A higher wire speed can lead to insufficient heat, resulting in poor penetration, while a lower wire speed may provide adequate heat, allowing for deeper penetration into the base materials.
- Bead Appearance: The speed at which the wire is fed affects the shape and consistency of the weld bead. An optimal wire speed helps achieve a smooth and uniform bead, while incorrect speeds can lead to inconsistencies such as excessive spatter, undercutting, or a flat bead, all of which compromise the visual and structural integrity of the weld.
- Weld Strength: The combination of wire speed and voltage contributes significantly to the overall strength of the weld. If the wire speed is too high, it can lead to a lack of fusion, whereas a too-low speed can lead to overheating and warping, ultimately affecting the durability and load-bearing capacity of the welded joint.
- Heat Input: Wire speed impacts the heat input into the weld area, which is crucial for achieving the desired metallurgical properties. By adjusting the wire speed in conjunction with the voltage, welders can control the heat input to optimize weld properties, such as toughness and resistance to cracking.
- Spatter Control: The correct wire speed can minimize spatter during the welding process. An optimal balance helps maintain a stable arc, reducing the amount of molten metal that escapes the weld area, which is important for maintaining a clean working environment and reducing post-weld cleanup.
What Are the Recommended Wire Speeds for Various Material Types?
The recommended wire speeds for various material types in MIG welding can vary significantly based on the material and thickness being welded.
- Mild Steel: For mild steel, the recommended wire speed typically ranges from 300 to 600 inches per minute (IPM). This setting ensures a stable arc and good penetration, which is crucial for achieving strong welds in thicker sections.
- Stainless Steel: When welding stainless steel, the wire speed should be adjusted to about 250 to 450 IPM. A slower wire speed is often necessary to prevent burn-through and to maintain control over the weld pool, especially with thinner materials.
- Aluminum: For aluminum, wire speeds can vary widely from 300 to 550 IPM, depending on the thickness of the material. Aluminum requires a higher feed rate due to its low melting point and high thermal conductivity, which helps to avoid issues with warping or burn-through.
- Galvanized Steel: The recommended wire speed for galvanized steel is about 200 to 400 IPM. Since zinc can produce harmful fumes when heated, a lower wire speed helps manage heat input and allows for better control of the welding process.
- Brass: Brass welding requires a wire speed of approximately 200 to 300 IPM. This low speed is necessary to control the heat input and prevent the material from melting too quickly, which could lead to poor weld quality.
How Do Voltage and Wire Speed Work Together in MIG Welding?
In MIG welding, selecting the best voltage and wire speed is crucial for achieving optimal weld quality and penetration.
- Voltage Settings: The voltage in MIG welding controls the arc length and heat input into the weld. Higher voltage settings typically increase the arc length, allowing for deeper penetration, while lower voltages lead to a shorter arc and a more stable weld pool, which is essential for thin materials.
- Wire Speed: Wire speed determines the amount of filler metal being fed into the weld pool. A higher wire speed increases the deposition rate, which can improve productivity but may lead to excessive buildup if not balanced with the right voltage, while a slower wire speed can result in insufficient fill and a weak joint.
- Balancing Voltage and Wire Speed: Achieving the correct balance between voltage and wire speed is vital for creating sound welds. If the wire speed is too high for a given voltage, it can cause the weld to be cold and lack penetration, while too low of a wire speed can lead to excessive heat and burn-through on thinner materials.
- Material Thickness Consideration: The thickness of the materials being welded influences the best voltage and wire speed settings. Thicker materials generally require higher voltage and faster wire speeds to ensure adequate heat and penetration, whereas thinner materials benefit from lower settings to prevent warping or burn-through.
- Welding Position: The position in which welding occurs—flat, horizontal, vertical, or overhead—can affect the choice of voltage and wire speed. Vertical and overhead positions may necessitate adjustments in both settings to maintain control over the weld pool and achieve proper fusion.
What Is the Relationship Between Voltage and Wire Speed?
According to the American Welding Society (AWS), the correct voltage and wire speed settings are critical for achieving desired weld characteristics, as improper adjustments can lead to issues such as poor penetration, excessive spatter, and weak welds.
Key aspects of this relationship include the concept that increasing voltage generally increases the heat input, which can lead to deeper penetration but may also cause burn-through in thinner materials. Conversely, increasing wire speed provides more filler material, which can help in maintaining a stable arc but can also lead to insufficient heat if the voltage is not adequately adjusted. Therefore, finding the right balance between these two settings is essential for effective welding.
This relationship impacts the quality and efficiency of the welding process significantly. For instance, a common guideline is that for steel material, an increase in voltage by 1 volt typically requires an increase in wire speed by approximately 10 inches per minute (ipm) to maintain a proper arc length. Statistically, improper settings can lead to defects in about 25% of welds, which can be costly in terms of rework and material waste.
The benefits of understanding and optimizing voltage and wire speed in MIG welding include enhanced weld quality, reduced rework, and increased productivity. Properly set parameters can also extend the life of the welding equipment and reduce the risk of workplace incidents associated with poor welding practices.
Best practices involve conducting test welds to find the ideal settings for specific materials and thicknesses, using a welder’s chart for reference, and continuously monitoring the arc behavior during the welding process. Additionally, employing advanced welding machines with auto-set features can help in automatically adjusting these parameters for optimal results.
How Can You Adjust Voltage and Wire Speed for Optimal Welds?
To achieve optimal welds in MIG welding, adjusting voltage and wire speed is crucial.
- Voltage Settings: Voltage is a key factor that influences the arc length and the heat input of the weld.
- Wire Speed: Wire speed controls the amount of filler material being fed into the weld pool, affecting penetration and bead shape.
- Material Thickness: The thickness of the material being welded determines the appropriate voltage and wire speed settings.
- Gas Type and Flow Rate: The type of shielding gas used and its flow rate can impact the welding performance and quality.
- Welding Position: The position in which you are welding (flat, horizontal, vertical, or overhead) can influence the adjustments needed for voltage and wire speed.
Voltage Settings: Adjusting the voltage affects the arc characteristics; higher voltage leads to a wider arc and deeper penetration, while lower voltage results in a narrower arc and less penetration. Finding the right balance is essential to prevent issues like burn-through on thin materials or insufficient penetration on thicker pieces.
Wire Speed: Increasing the wire speed adds more filler material to the weld pool, which can help improve bead shape and penetration. Conversely, if the wire speed is too high, it can lead to a cold weld or excessive spatter, while too low a speed may result in lack of fusion and weak welds.
Material Thickness: For thinner materials, lower voltage and wire speeds are often recommended to avoid burn-through, while thicker materials usually require higher settings for adequate penetration and strength. Always refer to the manufacturer’s guidelines for specific voltage and wire speed recommendations based on material thickness.
Gas Type and Flow Rate: The choice of shielding gas (such as Argon, CO2, or a mix) plays a significant role in the quality of the weld. Additionally, the flow rate should be adjusted based on environmental conditions to prevent contamination of the weld pool, as too high a flow can blow away the shielding gas, leading to defects.
Welding Position: Different welding positions may require adjustments in both voltage and wire speed to ensure a stable arc and consistent weld quality. For instance, vertical and overhead positions may need slower wire speeds to maintain control, while flat positions can often accommodate faster speeds and higher voltages.
What Common Mistakes Should Be Avoided Regarding Voltage and Wire Speed?
When setting up for MIG welding, it’s crucial to avoid common mistakes related to voltage and wire speed to achieve optimal results.
- Incorrect Voltage Setting: Using a voltage setting that is too high or too low can lead to problems such as poor penetration or excessive spatter. A high voltage may cause the weld to burn through thin materials, while a low voltage might not provide enough heat, resulting in weak welds.
- Improper Wire Speed Adjustment: Failing to adjust the wire speed according to the material thickness and type can result in inconsistent weld quality. Too fast of a wire feed can lead to inadequate fusion and increased spatter, while a slow feed might cause the weld to be too cold and not penetrate properly.
- Neglecting Material Thickness: Not considering the thickness of the base metal when selecting voltage and wire speed can compromise the integrity of the weld. Thicker materials typically require higher voltage and wire speed settings to achieve proper heat input, whereas thinner materials need careful adjustments to avoid burn-through.
- Ignoring Shielding Gas Type: The choice of shielding gas affects the optimal voltage and wire speed settings. Different gases can alter the arc characteristics, so it’s essential to adjust your settings according to the gas used for better weld quality and to prevent defects like porosity.
- Overlooking Travel Speed: The speed at which you move the MIG gun can impact the weld bead formation and penetration. A travel speed that is too fast may not allow sufficient heat to build up, while moving too slowly can lead to excessive heat input and distortion of the workpiece.
How Can Incorrect Settings Affect Your Weld?
Incorrect settings can significantly impact the quality and efficiency of your MIG welding.
- Voltage: The voltage setting influences the arc length and heat input during welding.
- Wire Speed: This controls the amount of filler material fed into the weld pool and affects penetration and bead shape.
- Inconsistent Settings: Fluctuations in voltage and wire speed can lead to poor weld quality and inconsistent results.
- Material Thickness: Using the wrong voltage and wire speed for the thickness of the material can result in undercutting or burn-through.
- Shielding Gas Flow: Incorrect settings can also affect the gas coverage, leading to contamination and defects in the weld.
Voltage: The voltage setting is crucial for maintaining a stable arc; too low voltage can cause insufficient penetration and a weak bond, while too high can result in excessive heat, leading to warping or burn-through. Adjusting voltage according to the material and joint configuration ensures optimal arc stability and weld quality.
Wire Speed: Wire speed determines how quickly the filler material is fed into the weld; if set too low, it can cause an insufficient weld pool, whereas too high a speed may lead to a larger bead with poor penetration. Matching wire speed with voltage is essential for achieving a balanced weld that adheres properly to the base materials.
Inconsistent Settings: If voltage and wire speed fluctuate during the welding process, it can create inconsistent bead appearance and strength, making it challenging to produce a uniform weld. Maintaining consistent settings throughout the weld helps achieve a reliable and aesthetically pleasing result.
Material Thickness: Different materials require specific voltage and wire speed settings; for thinner materials, lower settings are necessary to prevent burn-through, while thicker materials may need increased voltage and speed for adequate penetration. Understanding the relationship between material thickness and welding parameters is essential for effective MIG welding.
Shielding Gas Flow: The gas flow rate should complement the voltage and wire speed; improper settings can lead to inadequate shielding, resulting in porosity or other defects in the weld. Ensuring the correct gas coverage is vital for protecting the weld pool from contamination and achieving a strong, clean weld.
What Are Signs That Voltage and Wire Speed Are Not Set Correctly?
Signs that voltage and wire speed are not set correctly during MIG welding can significantly impact the quality of the weld.
- Burnthrough: This occurs when the voltage is too high or the wire speed is too fast, causing excessive heat that melts through the base material.
- Porosity: The presence of small holes or voids in the weld indicates improper settings, often due to insufficient shielding gas coverage or incorrect voltage.
- Excessive Spatter: When there is too much spatter during welding, it usually signals that the voltage is too high or the wire speed is too fast.
- Weak Welds: If the weld joints are weak or have poor penetration, it may indicate that either the voltage is too low or the wire speed is insufficient.
- Weld Bead Appearance: An uneven or inconsistent weld bead may suggest that voltage and wire speed are not optimized for the material and thickness being welded.
Burnthrough is most common with thin materials, where the high heat can penetrate entirely, leading to holes in the workpiece. Adjusting the voltage lower or decreasing the wire feed speed can help mitigate this issue.
Porosity can arise from a high voltage setting that creates turbulence, allowing atmospheric contaminants to enter the weld pool. Lowering the voltage or ensuring proper gas flow can improve the quality of the weld and reduce porosity.
Excessive spatter can lead to a messy work environment and may require additional cleanup and grinding after welding. Reducing the voltage or adjusting the wire feed speed can help create a cleaner weld with less spatter.
Weak welds can compromise the structural integrity of the finished product, making it critical to achieve proper settings. Increasing the voltage or wire speed can often enhance penetration and strength.
A uniform bead is crucial for aesthetic and structural reasons; irregularities can indicate improper settings, leading to issues in performance. Fine-tuning the voltage and wire speed can result in a smoother, more consistent bead.