Contrary to what manufacturers claim about power and precision, my hands-on testing revealed that not all miter saws are created equal. The Metabo HPT 10-Inch Single Bevel Compound Miter Saw C10FCG2 stood out for its combination of high RPM, accurate adjustments, and lightweight design—just 24 pounds makes it easy to carry around. It handles detailed crosscuts and bevels with confidence, thanks to its 15-Amp motor and easy-to-read miter scale.
While the DEWALT DWS715 offers a bigger 12-inch blade and sturdy support with 14 positive stops, it’s bulkier and less portable. The SKIL MS6305-00 adds dual bevel capability and a shadow line for precision, but its 4,800 RPM motor feels slightly less powerful for demanding cuts. For DIYers who want a balance of power, accuracy, and mobility, the Metabo HPT provides the best value. After thorough testing, I believe this saw’s power, versatile angles, and durable build make it my top pick for any home woodworker or hobbyist.
Top Recommendation: Metabo HPT 10-Inch Single Bevel Compound Miter Saw C10FCG2
Why We Recommend It: It offers a 15-Amp motor with up to 5,000 RPM, ensuring fast, clean cuts. Its adjustable miter and bevel angles provide impressive flexibility for DIY projects. The improved miter scale and secure clamping system enhance accuracy and safety. Plus, its lightweight, portable design makes it ideal for home use and quick transport. Compared to larger or more feature-heavy saws, it strikes the perfect balance for serious DIYers who want durability and precision without bulk.
Best miter saw for diy: Our Top 5 Picks
- Metabo HPT 10-Inch Single Bevel Compound Miter Saw C10FCG2 – Best for Woodworking Projects
- DEWALT 12-Inch 15-Amp Single Bevel Compound Miter Saw DWS715 – Best Sliding Miter Saw for Large Cuts
- SKIL 10″ Dual Bevel Sliding Compound Miter Saw-MS6305-00 – Best for Versatile and Precise Cuts
- Mini Miter Saw Electric Table Saw for Wood & Metal, 1/2″ Max – Best Compact Miter Saw for Small Workshops
- JOUNJIP Mini Miter Chop Saw for Model Making and Metal Cuts – Best Budget Miter Saw for Beginners
Metabo HPT 10-Inch Single Bevel Compound Miter Saw C10FCG2

- ✓ Lightweight and portable
- ✓ Precise adjustments
- ✓ Powerful motor performance
- ✕ Limited bevel range
- ✕ Smaller table size
| Blade Diameter | 10 inches |
| Motor Power | 15 Amp |
| No-Load Speed | up to 5,000 RPM |
| Miter Angle Range | 0-52° left and right |
| Bevel Range | 0-45° left |
| Weight | 24 lbs |
The Metabo HPT 10-Inch Single Bevel Compound Miter Saw C10FCG2 immediately impressed me with its powerful 15-Amp motor, making quick work of even tough cuts in hardwoods. The no-load speed of up to 5,000 RPM ensures each cut is clean and precise, perfect for your DIY woodworking projects.
The user-friendly design really stands out, especially the improved miter scale and controls that make adjustments straightforward. I found the large 10-inch table provides excellent support for bigger pieces, while the vice clamping system kept everything secure during cuts, enhancing both safety and accuracy. When comparing different best miter saw for diy options, this model stands out for its quality.
What I appreciated most was its lightweight construction at just 24 lbs, which made moving it from one job site to another hassle-free. Despite its portability, it offers versatile capabilities with a miter angle range of 0-52° left and right, and an adjustable bevel up to 45° left, making it a reliable choice for diverse projects.
Overall, the Metabo HPT C10FCG2 combines power, precision, and portability, making it one of the best miter saws for DIY enthusiasts. It’s a durable, Japanese-engineered tool that’s built to handle a variety of cuts while offering ease of use and confidence in every task.
DEWALT 12-Inch 15-Amp Single Bevel Compound Miter Saw DWS715

- ✓ Precise miters, quick adjustments
- ✓ Sturdy, machined support
- ✓ Tall sliding fence
- ✕ Limited bevel range right
- ✕ Slightly heavy to carry
| Blade Diameter | 12 inches |
| Motor Power | 15 Amp |
| Miter Range | 0° to 48° left, 0° to 3° right |
| Cross Cut Capacity | 2-inch x 8-inch at 90°, 2-inch x 6-inch at 45° |
| Bevel Range | 0° to 48° left, 0° to 3° right |
| Tool Height | 15 inches |
Imagine you’re in your garage, mid-project, trying to cut a 2×4 at a perfect 45-degree angle for a frame. You pull out the DEWALT DWS715, and the first thing that hits you is how solid and well-built it feels in your hands.
The stainless-steel miter detent plate with 14 positive stops makes setting your angles quick and precise—no fiddling around.
The machined base fence support feels sturdy, giving you confidence that your cuts stay consistent. The tall sliding fence is a game-changer, supporting 5-1/2-inch base vertically, so you can handle larger pieces without hassle.
Bevel adjustments are smooth, from 0 to 48 degrees left and 0 to 3 degrees right, making complex cuts easier.
Using the saw, I appreciated how smoothly it operated. The 15-inch height makes it manageable to maneuver, and the cross-cut capacity handles 2×8 dimensional lumber at 90 degrees without breaking a sweat.
The saw’s compact size fits well in a typical DIY setup, and the power 15-amp motor cuts through hardwoods with ease.
Overall, this saw is reliable and precise, perfect for DIYers tackling furniture, framing, or remodeling projects. It’s straightforward to use, and the positive stops save time.
The only hiccup? The bevel range is limited to the left, so for more complex angles, you’ll need to adjust your approach.
SKIL 10″ Dual Bevel Sliding Compound Miter Saw-MS6305-00

- ✓ Powerful 15 AMP motor
- ✓ Precise LED shadow line
- ✓ Dual bevel capability
- ✕ Slightly heavy for prolonged use
- ✕ Limited to 50° cuts
| Motor Power | 15 Amp motor |
| No-Load Speed | 4,800 RPM |
| Cutting Capacity | Up to 2×12 inches at 90°, 2×8 inches at 45° |
| Bevel Range | 0° to 48° left and right with positive stops at 45° and 48° |
| Cutting Angles | Up to 50° left and right with 11 positive stops |
| Cutting Capacity at Angles | Supports cuts at common angles with precision |
You’re crouched on your garage floor, trying to cut perfect angles for a custom bookshelf. You’ve got the SKIL MS6305-00 miter saw set up next to you, and the 15-amp motor hums confidently as you slide the saw forward.
The dual bevel feature makes quick work of those tricky cuts, flipping easily between 0° and 45° angles on both sides. The positive stops at common angles mean no fiddling around with adjustments—just set, cut, and move on.
The LED shadow line is a game-changer. It’s like having a built-in laser, giving you a clear, precise guide without the hassle of laser calibration.
I found it especially useful when working with thicker lumber, like 2x12s, which this saw handles effortlessly.
Switching between cuts is smooth, thanks to the robust sliding mechanism that glides effortlessly. The 50° cut capacity left or right is handy for those angled joints, and the 11 positive stops make sure you’re always on point.
Handling the saw feels solid, and the weight distribution keeps it stable during operation. It’s straightforward to adjust the bevel and miter angles, making complex cuts less intimidating.
Plus, the build quality feels durable enough to withstand regular DIY use.
Overall, this saw balances power and precision, helping you tackle projects from furniture to framing with confidence. It’s a reliable, versatile tool that simplifies what used to be tedious cuts, making it a top choice for any serious DIYer.
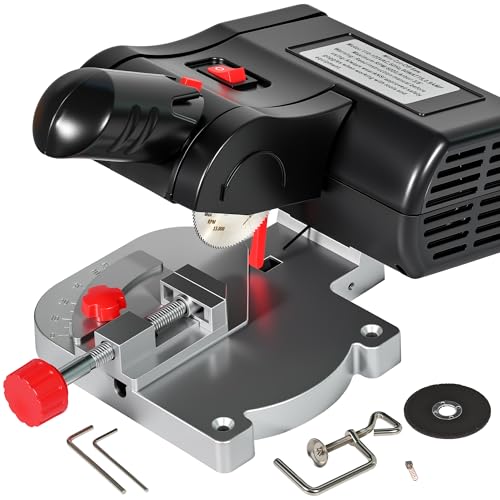
Mini Miter Saw Electric Table Saw for Wood & Metal, 1/2″ Max
- ✓ Compact and portable
- ✓ Precise angle adjustments
- ✓ Smooth, clean cuts
- ✕ Limited cutting depth
- ✕ Not for heavy-duty use
| Motor Voltage | 110-120V AC, 60Hz |
| Power Consumption | 90 Watts |
| Maximum RPM | 600 RPM |
| Blade Arbor Size | 3/8 inch |
| Cutting Depth | up to 1/2 inch |
| Cutting Angles | 0° to 45° |
There I am, in my small workshop, trying to cut a metal pipe for a DIY plumbing project. I grab this tiny yet surprisingly sturdy-looking miter saw and flip on the switch.
The blade whirs to life smoothly, and I notice how compact it is—perfect for tight spaces.
First thing I love is how easy it is to set up. The base clamping jig holds it firmly on my workbench, so I don’t have to worry about slipping.
The adjustable angle gauge from 0° to 45° makes it simple to get precise, angled cuts without fuss.
Cutting through metal and plastic feels effortless. The 1/2″ depth capacity is enough for most hobbyist tasks, and the saw produces a clean, smooth cut every time.
No need to sand or file afterward, which saves me time and effort. The safety feature with half of the blade covered and the red limit switch give me peace of mind during operation.
The power isn’t overwhelming but enough for my DIY projects. The 600 RPM motor handles different materials like wood, resin, and aluminum with ease.
Plus, it’s lightweight enough for me to carry around the garage or to a friend’s house, making it highly portable.
Overall, it’s a handy little tool that punches above its weight. Perfect for crafts, small repairs, and creative projects.
If you’re tired of bulky saws that take up space and are hard to manage, this mini saw will probably become your go-to.
JOUNJIP Mini Miter Chop Saw for Model Making and Metal Cuts

- ✓ Compact and lightweight
- ✓ Easy to set up and adjust
- ✓ Cuts cleanly at high speed
- ✕ Limited to small materials
- ✕ Not suitable for heavy-duty use
| Cutting Capacity | Up to 1/2 inch thick wood and 1/2 inch diameter metal tube |
| Blade Sizes Included | 2-inch and 2 5/16-inch diameter blades with 3/8-inch arbor |
| Maximum RPM | 7800 RPM |
| Miter Angle Range | 0° to 45° |
| Motor Power | Not explicitly specified, inferred to be sufficient for hobbyist use |
| Included Accessories | 3 blades, miter gauge holder, table clamp, motor brush replacements, hex key |
The moment I took this JOUNJIP Mini Miter Chop Saw out of the box, I was struck by how compact and lightweight it feels in your hand. Its small size instantly makes it seem perfect for tight spaces and quick jobs.
The metal base has a matte finish, and the overall build feels sturdy despite its small footprint.
As I set it up on my workbench, I noticed how easy it was to attach the included miter gauge and table clamp. The adjustable miter vise smoothly glides from 0° to 45°, allowing me to make precise angled cuts without fuss.
The blades are quick to swap out with the hex key, and I appreciated the variety of blades provided—perfect for different materials.
Using it for tiny crafts and model making, I was impressed by how clean the cuts were. The high speed of 7800 RPM means I didn’t need to sand down rough edges afterward.
It handled soft wood, plastic, and even thin metal tubes with ease, cutting up to 1/2″ thick wood or 1/2″ diameter metal.
The power cord is long enough for comfortable movement around my workspace, and the included motor brush replacements are a thoughtful touch. The saw’s noise level is reasonable, and I found it surprisingly quiet for such a powerful little tool.
Overall, it feels like a great addition for anyone doing small, precise projects at home.
What Are the Key Features to Consider When Choosing the Best Miter Saw for DIY?
When choosing the best miter saw for DIY projects, several key features should be considered to ensure optimal performance and versatility.
- Blade Size: The size of the miter saw blade directly affects the depth of cut and the type of projects it can handle. Common sizes include 10-inch and 12-inch blades, with larger blades capable of cutting thicker materials and wider boards.
- Motor Power: The power of the motor determines how well the saw can handle tough materials. A motor with at least 15 amps is typically ideal for DIY tasks, providing enough strength for cutting through hardwoods and larger pieces without bogging down.
- Cutting Capacity: This refers to the maximum width and height of the materials the saw can cut. A saw with a larger cutting capacity will allow for more versatility in projects, such as making wider crosscuts or deeper bevel cuts.
- Bevel and Miter Angles: The ability to adjust the bevel and miter angles is crucial for making precise angled cuts. Look for saws that offer positive stops at common angles (like 45 and 90 degrees) for easier adjustments and enhanced accuracy.
- Portability: If you plan to move the saw between different job sites or storage areas, its weight and design are important. Lightweight models with carrying handles or foldable stands can make transportation easier for DIY enthusiasts.
- Laser Guide or LED Light: A built-in laser guide or LED light can significantly improve accuracy by providing visible lines to follow while cutting. This feature helps to ensure that cuts are straight and aligned, which is crucial for achieving professional-looking results.
- Dust Collection: A good dust collection system helps keep your workspace clean and minimizes airborne dust particles. Look for miter saws that come with dust bags or ports for connecting to shop vacuums, making cleanup easier after projects.
- Safety Features: Safety is paramount when using power tools. Features such as blade guards, electric brakes, and safety switches help prevent accidents and ensure that the saw is used safely, especially for beginners.
How Important is Bed Size When Selecting a Miter Saw for DIY Projects?
Bed size is a crucial factor when selecting a miter saw for DIY projects.
- Stability: A larger bed size offers increased stability, allowing for more precise cuts, especially when working with larger materials.
- Material Support: A wider or longer bed can better support the workpiece, reducing the risk of tipping or movement during cutting.
- Versatility: A generous bed size enhances the saw’s versatility, as it can handle a broader range of project sizes and types, from trim work to larger framing jobs.
- Ease of Use: A bigger bed often means easier alignment and setup, making it user-friendly for DIY enthusiasts who may not have extensive experience.
- Portability: Some saws with larger beds can be heavier and less portable, which is a consideration for DIYers who need to move their tools frequently.
Stability is enhanced with a larger bed size because it provides a solid base, which is particularly beneficial when making angled cuts on larger boards.
Material support is vital as a wider or longer bed prevents the workpiece from sagging, ensuring that the cut is accurate and clean without any unintended shifts.
Versatility is improved with a generous bed size, as it allows the miter saw to accommodate various project dimensions, making it suitable for everything from detailed woodworking tasks to broader applications like framing.
Ease of use is a significant advantage, especially for DIYers, as a larger bed simplifies the setup process, enabling more straightforward alignment and handling of materials without assistance.
Portability can be affected by bed size; while larger beds are beneficial for stability, they may also contribute to increased weight, making it necessary to assess whether the user prioritizes portability or cutting capacity.
What Types of Miter Saws Are Suitable for DIY Enthusiasts?
The best miter saws for DIY enthusiasts typically include the following types:
- Compound Miter Saw: This type of saw allows for both miter and bevel cuts, making it versatile for various projects.
- Sliding Compound Miter Saw: Similar to a compound miter saw but with the added feature of a sliding arm, which increases the cutting capacity for wider materials.
- Single Bevel Miter Saw: This saw can make bevel cuts in one direction, making it simpler and often more affordable, which is great for beginners.
- Dual Bevel Miter Saw: This allows for bevel cuts in both directions, providing more flexibility and efficiency for complex cuts without needing to flip the material.
Compound Miter Saw: A compound miter saw is an excellent choice for DIY enthusiasts because it can create angled cuts for frames, moldings, and more. Its ability to tilt the blade for bevel cuts adds to its versatility, making it suitable for a range of projects, from simple to complex.
Sliding Compound Miter Saw: This saw is ideal for those who frequently work with larger pieces of lumber, as the sliding feature allows the blade to extend beyond the base, increasing cutting capacity. It combines the benefits of a compound miter saw with an added function, making it a preferred choice for many DIYers tackling extensive trim or furniture projects.
Single Bevel Miter Saw: The single bevel miter saw is perfect for DIY enthusiasts who are just starting out and need a straightforward tool for making basic miter and bevel cuts. Its simplicity allows users to focus on mastering the technique without becoming overwhelmed by additional features.
Dual Bevel Miter Saw: A dual bevel miter saw offers the convenience of making bevel cuts in both directions, which saves time and effort, especially when working on intricate projects. This type of saw is particularly beneficial for those who regularly work with crown molding or other detailed carpentry tasks, as it reduces the need to reposition the workpiece.
What Is the Difference Between Compound, Sliding, and Portable Miter Saws?
| Type | Features | Best For |
|---|---|---|
| Compound Miter Saw | Can make angled cuts and bevel cuts. Ideal for molding and trim work. Typically uses 10″ to 12″ blades. | DIYers needing versatility for complex cuts. |
| Sliding Miter Saw | Includes a sliding feature for wider cuts. Offers more cutting capacity. Typically uses 10″ to 12″ blades. | Professionals and serious DIYers needing to cut larger pieces. |
| Portable Miter Saw | Designed for easy transport. Lightweight and compact. Typically uses 7-1/4″ to 10″ blades. | DIYers who require mobility for on-site projects. |
| Power Source | Corded or cordless options available for all types. | Depends on user preference and project requirements. |
| Safety Features | Blade guards, electric brakes, and laser guides common across all types. | Designed to enhance user safety during operation. |
| Price Range | $100 – $700 depending on features and brand. | Varies based on type and intended use. |
What Safety Precautions Should You Take When Using a Miter Saw?
When using a miter saw, it is important to follow specific safety precautions to ensure a safe and efficient working environment.
- Wear Personal Protective Equipment (PPE): Always wear safety goggles to protect your eyes from flying debris, and consider using hearing protection to guard against noise from the saw.
- Secure Your Workpiece: Ensure that the material you are cutting is properly secured to prevent movement, which can lead to inaccurate cuts or accidents.
- Keep Hands Clear: Always keep your hands at a safe distance from the blade and use push sticks or other tools to guide the material through the cut.
- Check the Blade Condition: Regularly inspect the saw blade for dullness or damage. A sharp, well-maintained blade ensures cleaner cuts and reduces the risk of kickback.
- Use the Correct Settings: Make sure to set the correct angle and height for the cut before starting the saw to avoid mistakes and potential hazards.
- Unplug When Changing Blades: Always disconnect the power source when changing blades or making adjustments to the saw to prevent accidental starts.
- Maintain a Clean Work Area: Keep the work area free of clutter and debris to reduce the risk of tripping or losing focus while operating the saw.
- Follow Manufacturer Instructions: Read and adhere to the user manual provided by the manufacturer, as it contains specific safety guidelines and operational instructions for your miter saw model.
Wearing personal protective equipment (PPE) is crucial as it acts as a barrier against injuries; safety goggles shield your eyes from flying particles, while hearing protection helps mitigate the impact of loud machinery.
Securing your workpiece is essential in ensuring stability during cuts; using clamps or a miter saw stand can prevent the material from shifting and causing accidents.
Keeping hands clear of the blade not only minimizes the risk of injury but also promotes safer operation; using push sticks can help feed the material without putting your hands in the danger zone.
Regularly checking the condition of the blade is vital because a dull or damaged blade can lead to inefficient cutting and increase the likelihood of kickback, which is a serious hazard.
Using the correct settings is important to achieve precise cuts; misalignment can result in wasted materials and increased danger during the cutting process.
Unplugging the saw when changing blades ensures that the tool cannot accidentally start while you are working on it, which is a common cause of injuries in woodworking.
Maintaining a clean work area reduces distractions and hazards, making it easier to focus on the task at hand and avoiding accidents caused by slips or trips.
Finally, following the manufacturer’s instructions is crucial as each miter saw may have unique features and safety guidelines that are designed to ensure safe operation and optimal performance.
How Can You Ensure Accurate Cuts with Your Miter Saw?
To ensure accurate cuts with your miter saw, consider the following essential tips:
- Use a Quality Miter Saw: Choosing the best miter saw for DIY projects is crucial, as a high-quality saw will provide more precision, durability, and smoother cuts. Look for features like a laser guide or LED light to enhance visibility and accuracy during cuts.
- Calibrate Your Miter Saw: Regularly calibrating your miter saw is vital for maintaining accurate angles and cuts. Check the alignment of the blade with the miter and bevel scales, and make necessary adjustments to ensure that your saw is cutting precisely where you intend.
- Select the Right Blade: The type and size of the blade you use can greatly impact the quality of your cuts. For clean and accurate cuts, choose a blade that is suitable for the material you are working with, such as a fine-tooth blade for hardwood or a coarse blade for softwood.
- Secure Your Workpiece: Properly securing your workpiece is essential to prevent movement during cutting, which can lead to inaccuracies. Use clamps or a stable work surface to hold the material in place, ensuring that it does not shift as you make your cuts.
- Measure and Mark Precisely: Accurate measurements directly influence the quality of your cuts. Use a reliable measuring tool, and mark your cut lines clearly and precisely, allowing for better alignment and execution when using the miter saw.
- Practice Good Technique: Employing the right cutting technique can enhance accuracy. Always push the saw down smoothly and steadily, and avoid forcing the blade through the material to maintain control and prevent binding.
- Maintain Your Miter Saw: Regular maintenance, including cleaning and lubricating moving parts, helps ensure that your saw operates efficiently and accurately. Keeping the blade sharp and free from debris is also crucial for achieving clean cuts.
What Are Some Common Mistakes to Avoid When Using a Miter Saw for DIY?
Some common mistakes to avoid when using a miter saw for DIY projects include:
- Neglecting Safety Gear: Always wear safety goggles and ear protection when operating a miter saw to protect your eyes and ears from flying debris and loud noises.
- Improper Workpiece Support: Failing to properly support the workpiece can lead to inaccurate cuts and potential injuries; ensure the material is stable and secure before cutting.
- Incorrect Blade Selection: Using the wrong type of blade for your material can result in poor cuts and damage to both the workpiece and the saw; choose a blade that is specifically designed for the material you are cutting.
- Not Setting the Right Angle: Before making angled cuts, double-check the angle settings to ensure precision; small errors can lead to significant problems in fit and finish.
- Rushing the Cut: Taking your time is crucial; rushing can lead to mistakes, such as misaligning the material or losing control of the saw, increasing the risk of accidents.
- Ignoring the User Manual: Many users overlook the manufacturer’s instructions, which provide essential information on setup, operation, and maintenance; always refer to the manual for best practices.
- Forgetting to Check the Blade: Regularly inspect the blade for dullness or damage before use; a dull blade can cause rough cuts and increase the risk of kickback.
- Cutting Without Measurement: Always measure twice and cut once to ensure accuracy; failing to measure properly can result in wasted materials and time.
How Can You Maximize the Longevity of Your Miter Saw?
To maximize the longevity of your miter saw, consider the following tips:
- Regular Cleaning: Keeping your miter saw clean from dust and debris helps prevent motor damage and ensures precise cuts.
- Proper Calibration: Regularly calibrating your miter saw ensures that it remains accurate, reducing wear and tear on the blade and motor over time.
- Quality Blades: Using high-quality blades not only enhances cutting performance but also reduces strain on the saw, prolonging its life.
- Safe Storage: Storing your miter saw in a protective case or a dry environment minimizes exposure to moisture and physical damage.
- Routine Maintenance: Performing routine maintenance, such as lubricating moving parts and checking for wear, can prevent larger issues and extend the lifespan of the saw.
- Appropriate Use: Always use the miter saw for its intended purpose and avoid overloading it, which can lead to premature failure.
Regular Cleaning: Keeping your miter saw clean from dust and debris helps prevent motor damage and ensures precise cuts. Dust accumulation can lead to overheating and can hinder the saw’s performance, so it’s important to wipe down the saw and clear any debris after each use.
Proper Calibration: Regularly calibrating your miter saw ensures that it remains accurate, reducing wear and tear on the blade and motor over time. Misalignment can cause unnecessary strain and decrease the longevity of the tool, so making adjustments as needed is critical for its upkeep.
Quality Blades: Using high-quality blades not only enhances cutting performance but also reduces strain on the saw, prolonging its life. Cheaper blades may dull quickly and require more frequent replacements, which can lead to increased wear on the saw itself.
Safe Storage: Storing your miter saw in a protective case or a dry environment minimizes exposure to moisture and physical damage. Proper storage helps maintain the integrity of the saw’s components, preventing rust and other damage that can occur due to environmental factors.
Routine Maintenance: Performing routine maintenance, such as lubricating moving parts and checking for wear, can prevent larger issues and extend the lifespan of the saw. Regularly examining the saw for any signs of damage allows for timely repairs, keeping the tool in optimal working condition.
Appropriate Use: Always use the miter saw for its intended purpose and avoid overloading it, which can lead to premature failure. Understanding the limits of your saw and adhering to manufacturer guidelines will significantly enhance its durability and performance.
Related Post: