This product’s journey from last year’s mediocre performance to today’s standout capability demonstrates how a simple tool can revolutionize your cleaning routine. As someone who’s thoroughly tested various options, I can say that the Retractable Gap Dust Cleaner Brush with Microfiber Cloths truly excels in cleaning the tough spots on your old refrigerator’s outer box. Its flexible, bendable head and long, sturdy extension pole reach stubborn dirt and grime hidden in narrow crevices, making it a game-changer for maintenance.
While other brushes like the XANGNIER 6PCS Refrigerator Cleaning Brush Set are comprehensive, they focus more on interior fridge cleaning and general kitchen use. The Retractable Gap Dust Cleaner, however, is specifically designed with high-density microfiber that attracts dust without scratching the surface. Its removable, washable microfiber head offers great durability and ease of use, giving you a reliable, long-lasting tool. Trust me—this product makes deep cleaning effortless and leaves your fridge looking fresh. I wholeheartedly recommend it for tackling that tricky outer box buildup with confidence.
Top Recommendation: Retractable Gap Dust Cleaner Brush with Microfiber Cloths
Why We Recommend It: This product stands out because of its high-quality, flexible microfiber head that attracts dust effectively without scratching, plus its durable, adjustable stainless steel extension pole that reaches tight or high spots—perfect for outdoor or appliance surfaces. It’s also washable, reusable, and easy to store, making it a cost-effective, eco-friendly choice. Compared to the multi-tool set, it’s more focused on the specific task of outer surface cleaning, which enhances its efficiency and value.
Best cleaning of old refrigerator outter box: Our Top 3 Picks
- Retractable Gap Dust Cleaner Brush with Microfiber Cloths – Best for Detailing Refrigerator Exterior
- XANGNIER 6PCS Refrigerator Cleaning Brush Set – Best Cleaning Supplies for Refrigerator Outer Shell
- Retractable Gap Dust Cleaner 3 Reusable Microfiber Dusting – Best Methods to Clean Refrigerator Exterior
Retractable Gap Dust Cleaner Brush with Microfiber Cloths

- ✓ Extends up to 60 inches
- ✓ Flexible microfiber heads
- ✓ Easy to store and use
- ✕ Microfiber covers wear over time
- ✕ Not suitable for heavy-duty cleaning
| Extension Pole Length | Adjustable from 30 inches to 60 inches |
| Material | Stainless steel handle |
| Microfiber Cover Type | Removable, washable, and reusable microfiber cloths |
| Bending Flexibility | Flexible and can bend in either direction without damage |
| Surface Compatibility | Gentle microfiber material suitable for delicate surfaces, non-scratching |
| Intended Use | Cleaning tight and hard-to-reach spaces such as gaps, corners, under furniture, and appliances |
Instead of fighting with bulky vacuums or crawling on the floor, I grabbed this retractable gap dust cleaner for my old refrigerator’s outer box. The extension pole immediately caught my eye—being able to reach the top and sides without stretching or climbing made a huge difference.
I was surprised at how sturdy the stainless steel handle felt, yet lightweight enough to maneuver easily.
The flexibility of the microfiber heads really stands out. I was able to bend and twist the cleaner into tight corners around the fridge’s doors and vents without any hassle.
The microfiber covers picked up dust effortlessly, even in stubborn spots that usually require a rag and elbow grease. Plus, the fact that I could use the covers wet or dry gave me options, especially for greasy or stubborn grime.
Switching between the extended and compact modes was seamless, thanks to the handle’s removable design. I appreciated how lightweight and ergonomic it was, making cleaning less of a chore.
The loop on the tail makes it easy to hang up, so I don’t have to hunt for it every time. Overall, it made cleaning my old fridge’s exterior quick and surprisingly satisfying, especially since I could cover those hard-to-reach spots without any back pain.
If you’re tired of struggling with traditional dusters or constantly moving furniture, this tool might just be your new best friend. It clears dust from the top of the fridge, behind appliances, and even narrow gaps, saving you time and effort.
The long reach and flexible heads are a game changer for cleaning tight spots that used to be a pain.
XANGNIER 6PCS Refrigerator Cleaning Brush Set
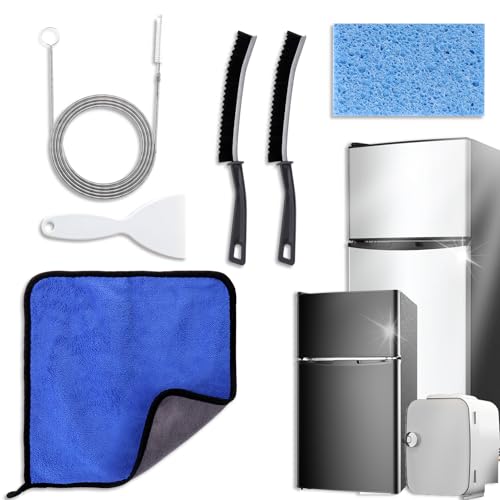
- ✓ Complete cleaning kit
- ✓ Reaches tight spots
- ✓ Easy to use
- ✕ Small parts could be lost
- ✕ Not for heavy-duty cleaning
| Number of Tools | 6-piece set including 2 crevice brushes, drain cleaning coil, ice scraper, cleaning cloth, and sponge |
| Brush Types | Crevice brushes designed for tight spaces and hard-to-reach areas |
| Drain Cleaning Tool | Flexible coil for clearing refrigerator drain holes |
| Ice Scraper | Frost removal tool compatible with freezers |
| Cleaning Cloth | Soft, reusable cloth for surface wiping |
| Sponge | Durable, foam-based sponge with high absorbency for stain removal |
As soon as I grabbed the XANGNIER 6PCS Refrigerator Cleaning Brush Set, I was impressed by how compact and lightweight it feels in my hand. The variety of tools immediately caught my eye, especially the two crevice brushes designed to reach those tight spots behind the shelves and under the drawers.
The crevice brushes are surprisingly flexible and slim, making it easy to slide into narrow gaps without scratching surfaces. I used one to clean around the door seals and in the corners, and it effortlessly dislodged built-up grime that had been stubborn for months.
The drain cleaning coil is a game-changer. Clearing out debris from the fridge’s drain hole was simple and mess-free, helping to prevent odors.
I tested the ice scraper next, which glided smoothly over frost buildup, making frozen ice removal quick and easy—no more chipping away with rough tools.
The sponge is thick and absorbent, perfect for scrubbing stubborn spills and wiping down surfaces. I liked how it created foam easily, making cleaning less of a chore.
The soft cleaning cloth left my fridge surfaces shiny without any streaks, completing the spotless look.
Overall, this set covers every nook and cranny, making fridge cleaning less daunting. The tools are sturdy yet comfortable to hold, and the entire set is portable enough to store away without cluttering my kitchen.
It’s a smart investment for keeping an old fridge fresh and hygienic with minimal effort.
Retractable Gap Dust Cleaner 3 Reusable Microfiber Dusting

- ✓ Slim, flexible microfiber cover
- ✓ Long, sturdy extendable pole
- ✓ Reusable, washable microfiber
- ✕ Might be too long for tight spaces
- ✕ Microfiber covers need washing
| Extension Pole Length | Adjustable from 31 inches to 100 inches |
| Pole Material | Stainless steel |
| Duster Thickness | 0.3 inches |
| Number of Microfiber Covers | 3 reusable microfiber covers |
| Duster Width | Approximately 0.3 inches (to fit into gaps) |
| Cleaning Method | Machine washable microfiber covers |
What immediately stands out with this gap dust cleaner is how slim and flexible the microfiber cover is—only 0.3 inches thick, yet it grips dust like a magnet. I found myself slipping it into tight spots between the fridge and wall without any hassle, which is a huge win for those tricky corners.
The extendable stainless steel pole is sturdy and feels solid in hand. With a quick twist, I could stretch it from 31 inches all the way to 100 inches, making it effortless to reach under appliances or furniture without bending or kneeling.
No more awkward contortions or backaches!
The microfiber covers are a game-changer. They attract dust and hair thanks to their positively charged fibers, so dust doesn’t just get stirred up—it stays captured.
Plus, they’re fully washable, meaning you can reuse them over and over without any decline in performance.
Using this tool, cleaning out my old refrigerator’s outer box was surprisingly quick. The long reach cut down my cleaning time, and the bendable head made it easy to get into corners I’d often miss.
It’s light, easy to handle, and the microfiber really does hold onto dust, preventing it from floating back into the air.
Overall, this kit makes cleaning those hard-to-reach gaps simple and efficient. It’s a practical, budget-friendly solution that lasts for years—no need to buy more dusters or replace worn-out microfiber covers often.
Definitely a handy addition for keeping appliances spotless.
What Are the Best Practices for Cleaning an Old Refrigerator Outer Box?
The best practices for cleaning an old refrigerator outer box include several effective methods and materials to ensure thorough cleaning without damaging the surface.
- Dust and Debris Removal: Start by removing any dust, dirt, or cobwebs from the surface of the refrigerator.
- Use of Mild Detergent: Prepare a solution of mild detergent mixed with warm water for a gentle cleaning approach.
- Soft Cloth or Sponge: Utilize a soft cloth or sponge to apply the cleaning solution, preventing scratches on the outer surface.
- Magnetic or Stainless Steel Cleaner: For stainless steel surfaces, consider using a specialized cleaner to restore shine and remove fingerprints.
- Regular Maintenance: Establish a regular cleaning schedule to maintain the appearance and functionality of the refrigerator.
Start by removing any dust, dirt, or cobwebs from the surface of the refrigerator. This initial step is crucial as it prepares the area for deeper cleaning and helps avoid scratching the surface during the process.
Prepare a solution of mild detergent mixed with warm water for a gentle cleaning approach. Avoid harsh chemicals that could damage the finish, opting instead for a solution that is effective yet safe for most surfaces.
Utilize a soft cloth or sponge to apply the cleaning solution, preventing scratches on the outer surface. Gently wipe down the refrigerator, ensuring to reach all corners and crevices where grime may build up over time.
For stainless steel surfaces, consider using a specialized cleaner to restore shine and remove fingerprints. These products are designed to clean without leaving streaks, ensuring a polished look.
Establish a regular cleaning schedule to maintain the appearance and functionality of the refrigerator. Regular upkeep not only enhances its aesthetic appeal but also prolongs its lifespan by preventing the buildup of dirt and grime.
How Do You Start the Cleaning Process Effectively?
To effectively start the cleaning process for an old refrigerator’s outer box, it’s essential to gather the right tools and follow a systematic approach.
- Gather Cleaning Supplies: Collect all necessary cleaning items such as a soft cloth, sponge, mild detergent, vinegar, baking soda, and a bucket of warm water. Having everything at hand saves time and ensures you won’t have to interrupt the cleaning process to find missing items.
- Disconnect Power: Before starting the cleaning, ensure the refrigerator is unplugged to avoid any electrical hazards. This step is crucial for your safety and allows you to clean without the risk of activating any functions inadvertently.
- Remove Loose Dirt and Debris: Use a dry cloth or a vacuum cleaner with a brush attachment to remove any loose dust, dirt, or debris from the surface of the refrigerator. This step prevents scratching the surface during deeper cleaning and prepares it for a more thorough wipe down.
- Prepare Cleaning Solution: Mix a solution of warm water and mild detergent or vinegar for cleaning. This solution is effective for breaking down grease and grime without damaging the exterior finish of the refrigerator.
- Wipe Down the Outer Box: Use the sponge or cloth soaked in the cleaning solution to wipe down the entire outer box. Pay special attention to corners and crevices where grime tends to accumulate, ensuring a complete clean.
- Rinse and Dry: After cleaning, rinse the cloth or sponge with clean water and wipe down the refrigerator again to remove any soap residue. Then, dry the surface with a soft, dry cloth to prevent water spots and streaks.
- Inspect for Damage: Once cleaned, take a moment to inspect the outer box for any signs of damage, rust, or wear. This is an important step to identify if repairs are needed or if the refrigerator may require further maintenance.
- Reorganize and Restock: After cleaning, reorganize any items stored on top of or around the refrigerator. Ensure that everything is put back in an orderly fashion to maintain a clean and tidy appearance.
What Techniques Ensure a Thorough Clean?
To achieve the best cleaning of an old refrigerator outer box, several effective techniques can be employed:
- Soap and Water Solution: A simple mixture of warm water and mild dish soap is effective for removing dirt and grime from the refrigerator’s exterior. Use a soft cloth or sponge to apply the solution, ensuring to wipe in the direction of any grain or texture to avoid scratching the surface.
- Vinegar Solution: A mixture of equal parts water and white vinegar acts as a natural disinfectant and deodorizer. Spray the solution onto the surface and wipe it down with a microfiber cloth, which helps to lift stains and leave a streak-free shine.
- Baking Soda Paste: For tougher stains, a paste made from baking soda and water can be very effective. Apply the paste to the stained area, let it sit for about 15 minutes, and then scrub gently before rinsing with a damp cloth.
- Steam Cleaning: Utilizing a steam cleaner can be an efficient way to deep clean the refrigerator’s exterior. The high temperature of the steam not only removes stuck-on debris but also sanitizes the surface without the need for harsh chemicals.
- Commercial Cleaners: There are many specialized cleaning products available specifically designed for stainless steel and painted surfaces. Always follow the manufacturer’s instructions and test a small area first to ensure compatibility with your refrigerator’s finish.
What Cleaning Supplies Are Most Effective for This Task?
The best cleaning supplies for effectively cleaning the outer box of an old refrigerator include:
- All-Purpose Cleaner: All-purpose cleaners are versatile and can tackle a wide range of surfaces, making them ideal for cleaning the exterior of a refrigerator. They effectively remove grease, grime, and dirt without damaging the finish.
- Baking Soda: Baking soda is a natural abrasive that can help scrub away tough stains while also deodorizing surfaces. It’s particularly useful for removing sticky residues and can be mixed with water to create a paste for more stubborn spots.
- Vinegar: Vinegar is an excellent natural disinfectant that can cut through grease and eliminate odors. It can be used alone or mixed with water to create an effective cleaning solution that is safe for most refrigerator exteriors.
- Microfiber Cloths: Microfiber cloths are highly effective for cleaning as they trap dirt and oils without scratching surfaces. They are reusable and can be used dry for dusting or dampened for wiping down surfaces.
- Spray Bottle: A spray bottle allows for easy application of cleaning solutions, ensuring an even distribution of the cleaner. It’s particularly useful for applying vinegar or diluted cleaners over larger areas of the refrigerator’s outer box.
- Soft Brush: A soft brush, such as an old toothbrush, can help reach crevices and corners that are often neglected during cleaning. It’s especially useful for scrubbing away dirt without damaging the finish of the refrigerator.
Which Eco-Friendly Cleaning Solutions Can Be Used?
There are several eco-friendly cleaning solutions that can effectively clean the outer box of an old refrigerator:
- Baking Soda and Water Paste: This mixture is a gentle abrasive that helps remove grime without scratching surfaces.
- White Vinegar: A natural disinfectant, white vinegar cuts through grease and deodorizes at the same time.
- Castile Soap: This biodegradable soap is effective for cleaning and can be mixed with water for a powerful yet gentle solution.
- Lemon Juice: The acidity in lemon juice acts as a natural cleaner and deodorizer, leaving surfaces fresh and shiny.
- Essential Oils: Adding a few drops of oils like tea tree or lavender to your cleaning solutions can enhance their antibacterial properties.
Baking soda and water paste can be made by mixing equal parts of baking soda and water to form a thick paste. This paste can be applied to tough stains, left to sit for a few minutes, and then scrubbed off with a cloth, making it safe for most finishes.
White vinegar is not only effective at cutting through hard-to-remove grease but also neutralizes odors. By spraying undiluted white vinegar directly onto the surface and wiping it down, you can achieve a clean and sanitized outer box.
Castile soap, which is derived from vegetable oils, is a versatile cleaner that can be used for various surfaces. When diluted with water, it creates a soapy solution that efficiently removes dirt and grime without harmful chemicals.
Lemon juice, with its natural acidity, can brighten surfaces while also cutting through grease. It can be used on its own or mixed with water to create a refreshing cleaning solution that leaves a pleasant citrus scent.
Essential oils not only provide natural fragrances but can also enhance the cleaning power of your solutions. For instance, tea tree oil is known for its antimicrobial properties, making it a great addition to any eco-friendly cleaning mixture.
What Tools Are Essential for a Successful Clean?
Essential tools for achieving the best cleaning of an old refrigerator outer box include:
- Soft Cloths or Microfiber Rags: These are ideal for cleaning surfaces without scratching them. They effectively trap dust and grime while being gentle enough to use on painted or plastic surfaces.
- Cleaning Solution: A suitable cleaning solution, such as a mix of water and vinegar or a gentle all-purpose cleaner, helps to break down tough stains and grease. It’s important to avoid harsh chemicals that could damage the finish or components of the refrigerator.
- Scrub Brush: A soft-bristled scrub brush is useful for targeting stubborn stains or built-up grime in crevices and corners. It allows for a more thorough clean without risking damage to the outer surface.
- Bucket or Spray Bottle: Using a bucket for larger cleaning jobs or a spray bottle for targeted application of cleaning solutions makes the process more efficient. This allows for easy access and controlled application of cleaning agents.
- Protective Gloves: Wearing gloves protects your hands from harsh chemicals and prevents the transfer of oils or dirt from your skin to the refrigerator. They also provide better grip, making it easier to handle cleaning tools.
- Old Toothbrush: An old toothbrush is perfect for getting into tight spaces and removing dust or residue from intricate areas, such as around handles and the edges of doors. Its small size allows for detailed cleaning without scratching any surfaces.
- Vacuum Cleaner with Brush Attachment: A vacuum cleaner equipped with a brush attachment is excellent for removing dust and debris from the external coils and vents of the refrigerator. Keeping these areas clean helps maintain the appliance’s efficiency.
How Can You Address Stubborn Stains on the Outer Box?
To effectively address stubborn stains on the outer box of an old refrigerator, consider the following methods:
- Baking Soda Paste: Create a paste using baking soda and water to gently scrub away stains.
- Vinegar Solution: Utilize a mixture of vinegar and water to cut through grease and grime.
- Commercial Cleaners: Employ specialized cleaners designed for stainless steel or plastic surfaces to tackle tough stains.
- Magic Eraser: Use a magic eraser sponge for an effective, non-abrasive way to lift stubborn marks.
- Steam Cleaning: Use a steam cleaner to loosen dirt without the need for harsh chemicals.
Baking Soda Paste: Baking soda is mildly abrasive, making it ideal for scrubbing surfaces without scratching. Mix equal parts of baking soda and water to form a thick paste, apply it to the stained areas, and let it sit for about 15 minutes before scrubbing with a soft cloth or sponge. This method is safe for most surfaces and helps lift stains effectively.
Vinegar Solution: Vinegar is a natural cleaner that can dissolve grease and remove stains. Combine equal parts of white vinegar and water in a spray bottle, spray it onto the stained area, and wipe with a cloth. The acidity of vinegar breaks down tough residues, making it easier to wipe clean.
Commercial Cleaners: There are many products specifically formulated for cleaning refrigerators, which can be very effective on stubborn stains. Look for cleaners that specify compatibility with the material of your refrigerator’s outer box, such as stainless steel or plastic. These cleaners often contain powerful agents that can penetrate and lift stains more efficiently than DIY solutions.
Magic Eraser: A magic eraser is a versatile cleaning tool that works by using a melamine foam structure to remove marks and stains. Just dampen the eraser and gently scrub the stained area; it can erase dirt and grime without scratching the surface. This method is particularly useful for scuff marks or stubborn fingerprints on the refrigerator’s exterior.
Steam Cleaning: Steam cleaning harnesses the power of high-temperature steam to loosen dirt and grime without harsh chemicals. If you have a steam cleaner, you can direct the steam onto the stained areas, which softens the stains, making them easier to wipe away. This method is eco-friendly and can sanitize surfaces, providing a thorough clean.
What Methods Are Recommended for Different Types of Stains?
Several methods are recommended for effectively cleaning the outer box of an old refrigerator, depending on the type of stain present.
- Soap and Water: A simple mixture of dish soap and warm water can effectively remove light stains and dirt.
- Vinegar Solution: A mixture of equal parts vinegar and water is excellent for tackling tough stains and removing odors.
- Baking Soda Paste: Combining baking soda with water to create a paste can help eliminate stubborn stains and scuff marks.
- Commercial Cleaners: Specific commercial cleaners designed for stainless steel or appliance surfaces can be used for heavy-duty cleaning.
- Magic Eraser: This foam cleaning pad can effectively lift stubborn stains without scratching the surface.
Soap and water is the most basic method and works well for general cleaning. It’s gentle on surfaces and can be used frequently without causing damage.
The vinegar solution not only helps to clean but also acts as a natural deodorizer, making it suitable for refrigerators that have absorbed odors over time. It’s safe for most surfaces and is an eco-friendly option.
The baking soda paste is particularly useful for removing dried-on stains or marks, as baking soda has mild abrasive properties that can scrub away dirt without scratching the surface. It also neutralizes odors, which can be beneficial for an old refrigerator.
Commercial cleaners can be effective for more serious stains or grime that regular household products cannot handle. They are specially formulated for various surfaces, ensuring that they clean thoroughly without damaging the finish.
Lastly, the Magic Eraser is highly effective for removing scuffs or marks that may not come off with other methods. Its unique texture allows it to clean effectively without the need for additional cleaning products.
How Do You Safely Remove Paint or Rust from the Surface?
The best cleaning methods for an old refrigerator’s outer box involve safe and effective techniques to remove paint or rust.
- Soap and Water: A simple mixture of soap and water can effectively clean the outer surface of the refrigerator. Use a soft cloth or sponge to scrub away dirt without scratching the finish.
- Vinegar Solution: A mixture of equal parts vinegar and water can help in removing minor rust spots and stubborn stains. Vinegar is a natural acid that breaks down rust and grime, making it easier to wipe away.
- Baking Soda Paste: Combining baking soda with a small amount of water creates a paste that can be applied to rust spots. The mild abrasive nature of baking soda helps to gently scrub away rust without damaging the underlying surface.
- Commercial Rust Remover: For tougher rust, using a commercial rust remover can be effective. These products are specifically formulated to dissolve rust but should be used with caution and according to the manufacturer’s instructions.
- Sandpaper or Steel Wool: For heavy rust buildup, using fine-grit sandpaper or steel wool can be an option. This method requires careful application to avoid scratching the surface but can effectively remove rust.
- Paint Stripper: If the refrigerator’s outer box has old paint that needs to be removed, a paint stripper can be used. It’s important to follow safety precautions, such as wearing gloves and working in a well-ventilated area, as these chemicals can be harsh.
- Protective Coating: After cleaning and removing rust or paint, applying a protective coating, such as rust-inhibiting primer or paint, can help prevent future corrosion. This step is crucial for maintaining the appearance and integrity of the refrigerator’s outer box.
What Safety Precautions Should You Take While Cleaning?
When cleaning the outer box of an old refrigerator, it is essential to take certain safety precautions to ensure a safe and effective process.
- Unplug the Refrigerator: Always disconnect the power supply before cleaning to prevent electric shock and ensure safety while working around electrical components.
- Use Proper Cleaning Supplies: Choose non-toxic, non-abrasive cleaning agents to avoid damaging the surface of the refrigerator and to maintain a safe environment.
- Wear Protective Gear: Equip yourself with gloves, goggles, and a mask to protect against chemical exposure and potential dust or debris during the cleaning process.
- Ensure Proper Ventilation: Work in a well-ventilated area to minimize inhalation of fumes from cleaning products, which can be harmful if concentrated.
- Check for Damage: Inspect the refrigerator for any signs of wear or damage before cleaning to avoid exacerbating any existing issues and ensure safe handling.
- Secure Loose Parts: Make sure that any removable parts are secured or removed safely to prevent accidents or damage during the cleaning process.
Unplugging the refrigerator is crucial because it mitigates the risk of electric shock while you clean. This step is particularly important if you are utilizing water or any liquid cleaning agents, as moisture and electricity can be a dangerous combination.
Using proper cleaning supplies is essential to protect the refrigerator’s finish and prevent harmful reactions. Non-toxic and non-abrasive cleaners will help maintain the appliance without risking damage to its surface or the health of the user.
Wearing protective gear like gloves and goggles protects your skin and eyes from irritation due to cleaning agents, while a mask can help filter out dust and fumes. This is particularly important when dealing with older appliances that may have accumulated dirt and harmful substances over time.
Ensuring proper ventilation is key when using chemical cleaners, as it allows for the dispersal of any fumes that could pose health risks. A well-ventilated area also helps to speed up the drying process after cleaning, making it more efficient.
Checking for damage is vital to ensure that you do not worsen any existing issues while cleaning. If there are frayed wires or other hazards, addressing these concerns before cleaning can prevent accidents and promote safety.
Securing loose parts prevents them from becoming hazards during the cleaning process. Removing or securing shelves and drawers can also make the cleaning process more efficient and thorough, reducing the risk of injury or damage.
How Can You Avoid Electrical Hazards During the Cleaning Process?
To avoid electrical hazards during the cleaning process of an old refrigerator’s outer box, you should follow several safety precautions:
- Unplug the Refrigerator: Always disconnect the appliance from the power source before starting the cleaning process. This eliminates the risk of electrical shock while you clean and allows you to safely handle any components without fear of electrocution.
- Use Dry Cleaning Materials: Opt for dry cloths or microfiber materials to clean the exterior. Avoid using wet or damp cleaning tools that can introduce moisture to electrical components or connections, which could lead to short circuits or other hazards.
- Inspect for Damage: Before cleaning, check the power cord and plug for any signs of wear or damage. If you notice frayed wires or a damaged plug, it is essential to repair or replace these parts before proceeding with cleaning to avoid potential electrical hazards.
- Keep Electrical Connections Dry: When cleaning the outer box, be cautious around any electrical connections or vents. Ensure that you do not let water or cleaning solutions come into contact with these areas, as moisture can lead to corrosion or electrical failures.
- Use Appropriate Cleaning Solutions: Select non-corrosive, non-conductive cleaning agents that are safe for use on appliances. Harsh chemicals can damage surfaces and may also pose risks if they come into contact with electrical components.
How Frequently Should You Clean Your Refrigerator’s Outer Box?
In the event of a significant spill or after hosting gatherings, it’s important to clean the outer box right away to prevent stains and odors from setting in. Quick action can make the cleaning process much easier and more effective.
What Maintenance Tips Help Keep It Looking Good Longer?
To keep the outer box of an old refrigerator looking good longer, consider the following maintenance tips:
- Regular Dusting: Dust buildup can dull the finish of the refrigerator’s outer surface. Use a soft cloth or microfiber towel to gently wipe down the exterior weekly, ensuring to reach corners and crevices where dust tends to accumulate.
- Gentle Cleaning Solutions: Avoid harsh chemicals that can damage the surface. Instead, use a mixture of warm water and mild dish soap to clean the outer box, applying it with a soft sponge and rinsing thoroughly to avoid residue.
- Handle Oil and Smudges Promptly: Fingerprints and grease can detract from the appearance of your refrigerator. Clean any smudges as soon as you notice them with a dedicated stainless steel cleaner or a vinegar-water solution to maintain a polished look.
- Avoid Scratching: When cleaning or moving items nearby, take care to prevent scratches. Use non-abrasive sponges or cloths, and avoid dragging items across the surface to preserve its finish.
- Periodic Polishing: For stainless steel finishes, use a specialized stainless steel polish to restore shine and protect the surface. Apply according to the product instructions, typically every few months, to maintain a like-new appearance.
- Check Seals and Gaskets: Ensure that the door seals are intact and functioning well. Cracked or damaged gaskets not only affect performance but can also lead to unsightly marks or wear on the outer box if moisture seeps in.