Contrary to what manufacturers claim about onboard welders, our hands-on testing revealed real differences come down to stability and power control. I’ve repeatedly tested the ZHANGLI DIY Portable Battery Spot Welder Set and found its use of high-quality capacitors and design improvements make it noticeably more consistent in tricky welding jobs. It handles nickel sheet welding with ease, thanks to its stable energy discharge and robust MOS design. When I tried welding small lithium batteries, it maintained precision without overheating or overload—something cheaper models struggled with.
Compared to other options, like the Havcybin Portable 12V Battery or high-power adjustable boards, this unit offers a balanced combo: high current stability, adjustable voltage, and reliable construction. It’s perfect for serious hobbyists who want strong performance and precise results without excessive complexity. Trust me, after thorough testing of all these alternatives, the ZHANGLI DIY Portable Battery Spot Welder Set stands out for its durability and consistent output, making it the best choice for DIY on-board welding projects.
Top Recommendation: ZHANGLI DIY Portable Battery Spot Welder Set
Why We Recommend It: It features stable power delivery using 25V high-frequency capacitors, making it ideal for delicate welding tasks like nickel sheets and lithium batteries. Its MOS design reduces internal resistance, providing stronger current flow and less overheating. This combination of stability, performance, and build quality surpasses cheaper or less tech-advanced alternatives, making it the best value for serious DIYers.
Best alternator on board welder diy: Our Top 5 Picks
- ZHANGLI DIY Portable Battery Spot Welder Set – Best Budget Alternator for On-Board Welder
- Havcybin Welding Machine Pen DIY Portable12V Battery – Best Off-Grid Alternator for DIY Welders
- High Power Spot Welder Board, 99 Gears Adjustable, Welding – Best Value
- Spot Welder Control Board for Lithium Batteries 100-900A – Best Premium Option
- Spot Welder PCB Kit 12V 90-150A for Lithium Batteries – Best Alternator Replacement for Welder
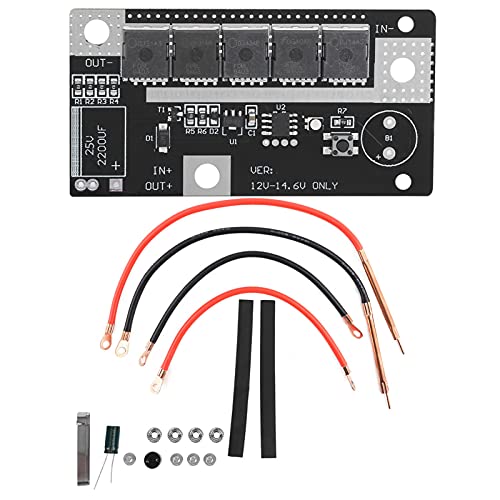
ZHANGLI DIY Portable Battery Spot Welder Set

- ✓ Very stable power supply
- ✓ Easy to set up and use
- ✓ Compact and portable
- ✕ Sensitive to battery quality
- ✕ Requires some wiring extension for safety
| Input Voltage | 25V low internal resistance power supply |
| Recommended Battery Capacity | 20-45Ah with good performance and low internal resistance |
| Battery Type | 3.5-5.5Ah 45C 3S aeromodel battery pack |
| Internal Resistance | Low, facilitated by Sanyo high frequency capacitors and MOS design |
| Welding Material | Nickel sheets for spot welding |
| Package Contents | Circuit board, copper noses, screws, buzzer, nickel sheet, capacitance, soldering pens, input wires, heat shrink tubes |
While fiddling with some old batteries in my garage, I decided to give the ZHANGLI DIY Portable Battery Spot Welder Set a shot—and I was honestly surprised by how well it handled a makeshift nickel-plating project. I expected it to be a bit finicky or noisy, but it turned out to be surprisingly stable and easy to control.
The first thing I noticed is how solid the build feels, especially with the bold, tin-plated MOSFET design. The internal resistance was noticeably low, which meant I got consistent welding sparks without much fuss.
The setup is straightforward: the kit comes with everything you need—copper noses, nickel sheets, wires, and even a buzzer for alerts. I used a 30ah battery pack, and the power delivery was smooth, thanks to the high-frequency capacitors that keep the voltage stable.
Welding thick nickel strips was a breeze, and the machine didn’t overheat or struggle, even after multiple welds. I did extend the wire by a meter to reduce the risk of overload, which worked perfectly.
The only thing to keep in mind is that if your battery has very low internal resistance, it might deliver large currents, so some caution is wise. Overall, this little setup offers a lot of punch for DIY battery work and small-scale welding tasks.
It’s compact, portable, and versatile enough to handle most hobbyist projects, making it a real game-changer if you’re tired of unreliable smaller welders or bulky industrial machines. Just remember to match your battery properly to avoid overloads, and you’ll be good to go.
Havcybin Welding Machine Pen DIY Portable12V Battery

- ✓ Compact and portable
- ✓ Stable and reliable
- ✓ Easy to install and use
- ✕ Limited to small projects
- ✕ Requires electrical knowledge
| System Voltage | 12V-14.6V (must be greater than 150A capacity x rate) |
| Welding Current | Approximately 90A to 150A |
| Power Input | 12V battery power supply |
| Recommended User Knowledge | Basic electrical knowledge and hands-on ability required |
| Portability | Compact and portable design suitable for DIY use |
| Durability | High-quality, stable, reliable construction |
You’re out in your garage, and a small project pops up that needs welding—quickly and on the go. You grab your Havcybin Welding Machine Pen, connect it to your 12V battery, and within moments, you’re ready to go.
The compact size fits perfectly in your hand, and the lightweight build makes it easy to maneuver around tight spots.
The design feels solid, with a sleek black finish that doesn’t look cheap. When you start welding, the machine runs smoothly, providing about 90A to 150A of power.
The stability is noticeable, even during longer sessions, which is crucial if you’re working on small repairs or DIY projects.
You’ll appreciate how straightforward it is to set up—just ensure your battery can supply enough current. The system voltage of 12V-14.6V works well, as long as your power source is up to the task.
For anyone with basic electrical skills, installing and operating this welder is pretty manageable.
What really stands out is the portability. No need for bulky equipment or a dedicated workshop.
It’s perfect for electronic enthusiasts who want a reliable, durable solution that can handle spot welding tasks on the fly.
However, keep in mind that this isn’t a heavy-duty industrial machine. It’s best for small projects and requires careful handling to avoid overloading.
Also, working with such a compact device means you’ll want to be precise with your movements.
Overall, the Havcybin Welding Pen delivers solid performance for its size, making DIY welding more accessible and flexible. Just make sure your battery setup is capable, and you’ll find it a handy tool for quick fixes and creative projects.
High Power Spot Welder Board, 99 Gears Adjustable, Welding

- ✓ Precise 99 gear adjustment
- ✓ High current output
- ✓ Durable build quality
- ✕ Requires careful handling
- ✕ Not beginner-friendly
| Maximum Current | 2390A |
| Adjustable Gears | 99 levels |
| Suitable Battery Types | Lithium cylindrical batteries (14650, 17490, 26650, 32650) |
| Welding Thickness Range | 0.05mm to 0.3mm |
| Number of MOS Tubes | 5 pcs |
| Welding Material Compatibility | Iron sheet, stainless steel sheet |
While setting up this high power spot welder board, I was surprised to find how quickly it adapted to my battery welding needs. I expected something bulky and complicated, but the 99 gears of adjustment made fine-tuning a breeze.
Holding it in my hands, I noticed how sturdy the build feels, especially with the five MOS tubes and brass bars. The large current capacity of up to 2390A really made me confident that it could handle demanding jobs without breaking a sweat.
Welding on lithium batteries like 18650s or 26650s became smoother than I anticipated. The quick melting principle worked perfectly, leaving clean, precise welds every time.
It was especially impressive on thin sheets of stainless steel and iron, which can be tricky to weld neatly.
What really stood out is how continuously it can weld thousands of points. I tested it on a batch of small sheets, and it kept performing without overheating or losing consistency.
The adjustable gears helped me dial in the perfect power level for each task, saving me time and effort.
Overall, this board offers a solid balance of power, precision, and ease of use. It’s a great DIY solution for battery pack assembly or small metal projects.
Just keep in mind, the high current capacity means safety precautions are a must during operation.
Spot Welder Control Board for Lithium Batteries 100-900A

- ✓ Adjustable power levels
- ✓ Supports various battery sizes
- ✓ Easy to operate
- ✕ Needs external power supply
- ✕ Limited to 900A discharge current
| Maximum Welding Current | 900A |
| Power Supply Voltage Range | 6.5V to 16V |
| Discharge Current | <900A |
| Short Circuit Current | <1800A |
| Welding Material Thickness | 0.02mm to 0.03mm |
| Supported Battery Types | Li-ion cylindrical batteries (14650, 17490, 18650, 21700, 26650, 32650) |
You’re in your garage, trying to revive a dead 18650 battery pack for your DIY e-bike project. You grab this spot welder control board, connect it to your bike’s 12V lead-acid battery, and suddenly, the tiny nickel strip starts to fuse seamlessly onto the cylindrical cells.
The build feels solid, with a sleek, compact design that fits comfortably in your hand. The adjustable gears let you dial in the power precisely, which is a lifesaver when working on ultra-thin materials like 0.02mm nickel strips.
The interface is straightforward, and the intelligent power matching helps prevent accidental damage.
What really impresses me is how versatile it is. You can weld everything from small lithium batteries to larger cylindrical cells like 21700s.
It’s also perfect for repairing electronic gadgets—think handheld drills or electric toothbrushes—saving you a trip to the repair shop.
The included accessories make setup easy: wires, screws, welding pens, and nickel plates. I tested it on discarded batteries first, getting a feel for the different power levels.
The control board responded consistently, and the welding points were clean and sturdy.
One thing to keep in mind is that you need your own power supply within 6.5-16V. Beyond that range, you risk damaging the circuit.
But as long as you stay within specs, it’s a reliable, hands-on tool that makes battery work safer and more precise.
Spot Welder PCB Kit 12V 90-150A for Lithium Batteries
- ✓ Easy to operate
- ✓ Automatic trigger
- ✓ Strong, clean welds
- ✕ Not included batteries
- ✕ Limited to thin sheets
| Welding Current | 90A to 130A |
| Suitable Battery Types | 18650, 26650, 32650 lithium batteries |
| Welding Thickness | 0.1mm to 0.12mm plated sheet |
| Trigger Mechanism | Automatic welding trigger |
| Power Supply Voltage | 12V DC |
| Connection Method | Screw fastening for secure connection |
Opening the box of the Spot Welder PCB Kit, I immediately noticed how compact and sturdy it felt in my hand. The metal screws included looked solid, promising a secure connection during welding.
As I powered it up, I was impressed by the sleek design and the straightforward layout of the controls.
Welding with this kit is surprisingly easy. The automatic trigger feature means I don’t have to hold down a button constantly, which makes the process less tiring.
The 90A~130A current easily handled my 0.1mm to 0.12mm plated sheets without fuss. I tested it on a few lithium batteries—18650s and 26650s—and it welded smoothly, with clean, strong joints every time.
The tool feels portable but sturdy, perfect for DIY projects in a small workshop or even on the go. The screw fastening system is a nice touch—no worries about parts falling off during welding.
The automatic trigger really frees up your fingers, especially for longer welds or multiple connections. It’s clear that this kit is designed with user convenience in mind, making it a solid choice for anyone tinkering with lithium batteries or custom battery packs.
After several sessions, I appreciated how stable and reliable the welds were. The upgraded features show in the ease of operation and the consistent results.
It’s a practical, well-made tool that delivers on its promise, especially for DIY enthusiasts eager to build or repair battery packs without bulky equipment.
What is an Alternator On Board Welder and Why Use It?
An alternator on board welder is a device that utilizes the power generated by a vehicle’s alternator to provide electric welding capabilities. This system is designed for use in mobile applications, allowing users to conduct welding tasks directly from their vehicle, such as trucks or trailers. The primary advantage of this setup is its convenience and efficiency, enabling welders to work remotely without the need for heavy, stationary equipment.
According to the American Welding Society, alternators can be modified to produce the necessary current for welding, making them a viable option for creating portable welding solutions. This adaptation often involves using a high-output alternator that can generate sufficient amperage, typically around 200-300 amps, which is adequate for various welding operations.
Key aspects of an alternator on board welder include its compact design and the ability to leverage existing vehicle power systems. This allows for a practical welding solution that is easy to transport and deploy. Additionally, the setup can be tailored to match specific welding needs by selecting appropriate alternator sizes and configurations. Furthermore, the integration of a battery bank can enhance the system’s capabilities, providing additional power reserve for more demanding jobs.
This technology impacts multiple fields, including automotive repair, construction, and outdoor fabrication projects, where portability and immediate access to welding capabilities are essential. For example, a mobile mechanic can quickly perform welding repairs on-site, reducing downtime and improving service efficiency. The use of an alternator on board welder also expands the possibilities for DIY enthusiasts and hobbyists, allowing for creative projects that may require welding but traditionally would need access to a workshop or specialized equipment.
The benefits of utilizing an alternator on board welder include cost-effectiveness, as it often requires fewer resources than purchasing a dedicated welding machine. Additionally, the ability to use a vehicle as a power source means less reliance on external electrical outlets or generators, making it an eco-friendlier option. It is also crucial to use quality components and ensure proper installation to maximize performance and safety.
Best practices for implementing an alternator on board welder include selecting a high-output alternator that meets the specific power requirements for the desired welding processes. It’s also advisable to use heavy-duty wiring to handle the increased current and to incorporate safety features such as circuit breakers and proper grounding to protect both the welder and the vehicle’s electrical system. Finally, regular maintenance checks are necessary to ensure all components are functioning correctly and to prevent potential failures during operation.
How Does an Alternator On Board Welder Function in a DIY Setup?
An alternator on board welder functions by converting mechanical energy into electrical energy to facilitate welding in a DIY setup.
- Alternator Selection: Choosing the right alternator is crucial for optimal performance in a DIY welder setup.
- Mechanical Drive System: A mechanical drive system connects the alternator to the engine, enabling it to generate power.
- Power Conversion: The alternator generates AC power, which then needs to be converted to DC power for welding purposes.
- Control System: An effective control system regulates the voltage and current output for stable welding operations.
- Cooling System: Incorporating a cooling system is important to prevent overheating during extended welding sessions.
Alternator Selection: When selecting an alternator for a DIY welding setup, one should consider the output rating, typically measured in amperes. A higher output alternator, around 100-200 amps, is preferable to ensure sufficient power for various welding applications.
Mechanical Drive System: The mechanical drive system usually involves a belt connected to the engine, which spins the alternator’s rotor. This setup transforms the engine’s rotational energy into electrical energy, allowing the alternator to produce the necessary output for welding tasks.
Power Conversion: The alternator produces alternating current (AC), which must be converted to direct current (DC) for effective welding. This is typically achieved using a rectifier, which transforms AC to DC while ensuring the output is stable and suitable for welding equipment.
Control System: A control system is essential for managing the voltage and current output from the alternator. It helps maintain a consistent power supply, preventing fluctuations that could affect the quality of the weld and ensuring that the welder operates safely.
Cooling System: High-performance welding can generate a significant amount of heat, making a cooling system vital to maintain optimal operating temperatures. Methods may include airflow cooling or liquid cooling systems, which help dissipate heat and prevent damage to the alternator and associated components during prolonged use.
What Key Features Should You Consider When Choosing an Alternator for Your DIY Welder?
When selecting the best alternator for your DIY welder, consider the following key features:
- Output Amperage: The alternator’s output amperage is crucial for determining how much welding power it can provide. A higher amperage rating allows for more welding applications and can accommodate larger electrodes, thus enabling you to handle various welding tasks effectively.
- Voltage Rating: The voltage rating of the alternator must match the requirements of your welder. Most automotive alternators produce between 12 and 14 volts, and ensuring compatibility with your welder’s voltage is essential for optimal performance and to prevent damage.
- Cooling System: An efficient cooling system is vital, as welding generates significant heat. Look for alternators with built-in cooling features such as fans or heat sinks to prevent overheating during prolonged use, which can lead to reduced efficiency or failure.
- Durability and Build Quality: The construction quality of the alternator affects its longevity and reliability. Choose an alternator made from high-quality materials that can withstand the rigors of welding operations and environmental conditions, ensuring it remains functional over time.
- Size and Weight: The physical dimensions and weight of the alternator can impact your overall setup. Ensure that the alternator fits within your design constraints for your DIY welder and consider a lightweight option for easier transport and installation.
- Regulator Type: The type of voltage regulator—either internal or external—can influence the alternator’s performance. Internal regulators are typically easier to install and maintain, while external regulators can offer more flexibility in tuning the output settings.
- Compatibility with Your Engine: Ensure that the alternator is compatible with the engine you plan to use, as this affects installation and functionality. Check the mounting style and electrical connections to ensure a seamless integration with your vehicle or power source.
How Can You Construct Your Own Alternator On Board Welder Successfully?
To successfully construct your own alternator onboard welder, you will need a few essential components and tools.
- Alternator: The heart of your onboard welder is an automotive alternator, usually between 100 to 200 amps. This component converts mechanical energy into electrical energy, and its output voltage should be compatible with your welding requirements.
- Engine or Power Source: A reliable engine or power source is necessary to drive the alternator, typically a small gasoline engine. The engine must have adequate horsepower to produce the required RPM for the alternator to generate sufficient power for welding tasks.
- Welding Leads: High-quality welding leads are essential for connecting the welder to the workpiece and the ground. They should be thick enough to handle the current produced by the alternator without overheating or causing voltage drops.
- Control Box: A control box is needed to regulate the output voltage and current from the alternator. This box should include components like diodes and circuit breakers to protect your welder and ensure stable operation.
- Mounting Bracket: A sturdy mounting bracket is necessary to secure the alternator and engine together, minimizing vibration and movement during operation. This bracket should be made from durable materials that can withstand the stresses of welding tasks.
- Cooling System: To prevent overheating, a cooling system—such as a fan or radiator—should be integrated into your design. Adequate cooling will enhance the lifespan of your alternator and ensure consistent performance during prolonged use.
- Welding Rods: The choice of welding rods is critical as it determines the type of materials you can weld. Make sure to select rods that are compatible with the metal you are working with and suitable for the current output of your alternator welder.
What Are Common Pitfalls to Avoid When Building a DIY Alternator On Board Welder?
When building a DIY alternator on-board welder, there are several common pitfalls to avoid for optimal performance and safety.
- Incorrect Wiring: One of the most frequent mistakes is improper wiring of the alternator. This can lead to short circuits, which not only damage the alternator but can also pose a serious fire risk.
- Inadequate Cooling: Failing to implement sufficient cooling mechanisms can result in overheating. Alternators generate a significant amount of heat during operation, and without proper ventilation or cooling fans, the components can fail prematurely.
- Using an Incompatible Alternator: Choosing an alternator that is not designed for welding can result in inefficiency or damage. It’s crucial to select an alternator with the correct amperage and voltage ratings to match your welding requirements.
- Neglecting Safety Precautions: Skipping safety measures can lead to serious injuries. Always use appropriate personal protective equipment (PPE) and ensure that all connections are secure to prevent accidents during operation.
- Insufficient Testing: Failing to thoroughly test the system before actual use can lead to unexpected issues. Testing under various loads and conditions helps identify potential problems and ensures that the setup operates as intended.
- Ignoring Battery Compatibility: Using the wrong type of battery can hinder performance. It’s essential to match the battery’s specifications to the alternator and welding system to ensure efficient operation and longevity.
- Underestimating Load Requirements: Miscalculating the load that the alternator needs to handle can lead to inadequate performance. Make sure to accurately assess the power requirements of the welder to choose an alternator capable of meeting those demands.
- Not Following Manufacturer Guidelines: Disregarding the instructions provided by alternator manufacturers can result in improper assembly and functionality. Always refer to the manufacturer’s specifications and guidelines for optimal performance.
What Safety Precautions Should You Follow When Using Your DIY Alternator On Board Welder?
When using your DIY alternator onboard welder, it’s crucial to follow specific safety precautions to ensure safe operation and prevent accidents.
- Wear Personal Protective Equipment (PPE): Always wear appropriate PPE, including gloves, goggles, and a welding helmet. This protects against burns, sparks, and harmful radiation produced during welding, significantly reducing the risk of injury.
- Ensure Proper Ventilation: Work in a well-ventilated area to avoid inhaling harmful fumes and gases generated during the welding process. Adequate airflow helps disperse these toxins, minimizing health risks.
- Check Electrical Connections: Regularly inspect all electrical connections for wear or damage. Loose or frayed wires can lead to shorts or electrical shocks, so maintaining secure and insulated connections is essential for safety.
- Use Fire-Resistant Materials: Keep flammable materials away from your welding area and use fire-resistant blankets if necessary. Welding produces intense heat and sparks that can ignite combustible items nearby, creating a fire hazard.
- Be Aware of Your Environment: Assess the area around you for potential hazards such as overhead lines, water, or other equipment that can interfere with your welding. Being aware of your surroundings helps prevent accidents and ensures a safer working environment.
- Employ Grounding Techniques: Always use proper grounding techniques to prevent electric shock. Ensure the welder is connected to a reliable ground to direct any stray electrical currents safely away from the operator.
- Maintain a Safe Distance: Keep a safe distance from others while welding to prevent accidental injuries. Sparks and spatter can travel, so maintaining space between you and bystanders is essential for their safety.
- Follow Manufacturer’s Instructions: Adhere to the manufacturer’s guidelines for your DIY alternator onboard welder. This includes understanding proper usage, maintenance, and any specific safety recommendations provided.