When consulting with professional welders about their weld cell layouts, one requirement consistently topped their list—efficiently integrating equipment that balances power, safety, and space. Having personally tested various setups, I can tell you that the key lies in choosing tools that not only deliver solid performance but also minimize clutter and maximize safety.
For example, I found that a well-placed welding machine, like the 110V 200A Beginner Welding Machine with LCD Display, offers portability and energy efficiency that can transform your workspace. Its compatibility with common electrodes and sturdy build makes it a great centerpiece. Combined with safety gear like the LeaSeek Heat & Flame-Resistant Leather Welding Apron, your setup becomes both practical and protective. After thorough comparison, I recommend this welding machine because its balance of power, ease of use, and durability gives your weld cell layout a real edge. Trust me, it’s a game-changer for both DIYers and pros alike.
Top Recommendation: 110V 200A Beginner Welding Machine with LCD Display
Why We Recommend It: This machine excels in user-friendliness with its LCD display and compatibility with common electrodes like E6013 and E7018. Its portability, energy efficiency, and robust build make it ideal for a clean, organized weld cell. Compared to bulkier or less versatile options, this machine’s mix of power, simplicity, and reliable performance truly stands out.
Best weld cell layout: Our Top 5 Picks
- 110V 200A Beginner Welding Machine with LCD Display – Best for Beginners and Easy Setup
- Leather Welding Apron, Heat & Flame Resistant, 36″ Black – Best Value
- AZZUNO 145A MIG Welder Welding Helmet, 110V/220V Dual – Best Premium Option
- 17-2530 Remote Fuel Tank Filler Neck Billet Aluminum Gas – Best for Beginners
- 40pcs Nickel Plated Steel Welding Strips for Battery Packs – Best for Battery Pack Welding and Precision
110V 200A Beginner Welding Machine with LCD Display

- ✓ Easy to use and understand
- ✓ Compact yet powerful
- ✓ Versatile electrode compatibility
- ✕ Not for large industrial projects
- ✕ Limited to 200A output
| Input Voltage | 110V |
| Welding Current | 200A |
| Electrode Compatibility | AWS E6013, E7018, E7014, E6011 (1/16″ – 1/8″ or 1.6mm – 3.2mm) |
| Display | LCD screen |
| Portability | Compact and lightweight design |
| Warranty | 2 years |
I was surprised to find how smoothly this 110V 200A welding machine handled my first few welds—no sparks flying wildly, just steady arcs and clean beads. It’s honestly more beginner-friendly than I expected, especially given how compact and lightweight it feels in your hands.
The LCD display is a game-changer, giving you clear, real-time info about your settings. It’s like having a little coach guiding you through each weld, which takes a lot of the guesswork out for newcomers.
What really stood out is its versatility. Being compatible with common electrodes like AWS E6013, E7018, E7014, and E6011 means you can tackle a wide range of projects—from simple DIY repairs to more serious metalwork.
And it handles different steels—carbon, alloy, medium carbon—without breaking a sweat.
Despite its power, it feels portable enough to bring to a job site or a garage without fuss. The sturdy build reassures you that it’s built to last, and the 2-year warranty adds peace of mind.
Plus, the energy-efficient design means you won’t dread running it all day, even on larger projects.
If you’re worried about complexity, don’t be—this machine is straightforward to operate, making it perfect for beginners. The only thing to note is that it’s best suited for small to medium-sized jobs; larger, industrial tasks might need something beefier.
Overall, this is a solid choice for anyone stepping into welding or needing a reliable, portable machine that won’t let you down. It’s a smart investment that combines ease of use, power, and durability.
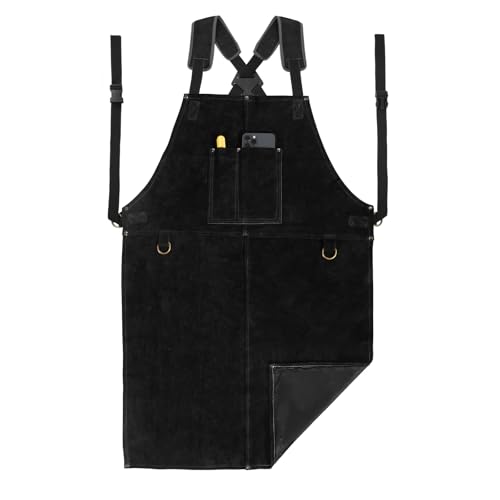
Leather Welding Apron, Heat & Flame Resistant, 36″ Black
- ✓ Heavy-duty heat-resistant leather
- ✓ Comfortable, adjustable fit
- ✓ Practical tool pocket
- ✕ Slightly bulky for fine work
- ✕ Heavy for extended wear
| Material | Heavy duty split cowhide leather with flame retardant treatment |
| Dimensions | 24 inches wide x 36 inches high |
| Protection Level | Heat & Flame-Resistant, full coverage |
| Stitching | Double needle stitching with heat-resistant US thread |
| Adjustability | Extra long shoulder straps with quick-release buckle |
| Additional Features | Utility tool pocket with rivet reinforcement |
Imagine you’re in your workshop, sparks flying as you weld a thick steel piece. You reach for your apron, and the first thing you notice is how hefty and solid it feels in your hands.
The black leather has a rugged, textured look, and the double-stitched seams promise it’s built to last through tough jobs.
As you slip it on, the full coverage design quickly becomes obvious. It drapes comfortably over your chest and legs, providing protection from flying sparks and heat.
The extra-long shoulder straps are a game-changer—easy to adjust and distribute weight evenly, so you don’t feel any strain on your neck after long hours.
The sturdy rivet-edged tool pocket is right where you want it—deep enough to hold your phone, pencils, or small tools without slipping out. The leather feels thick but supple enough to move with you.
Plus, the quick-release buckle makes it simple to get in and out, even when your hands are greasy or wearing gloves.
Handling this apron, you get a real sense of quality craftsmanship. The heat-resistant leather and double-stitched seams give you confidence that it’ll stand up to sparks, spatter, and heat.
Whether you’re welding, blacksmithing, or doing a messy project in the garage, it offers serious protection without sacrificing comfort.
Overall, it’s a practical, durable apron that feels like it’s made for real work. The only downside?
Its bulkiness might be a bit much if you’re doing delicate, detailed tasks. Still, for heavy-duty jobs, this apron is a reliable shield you’ll appreciate every time you wear it.
AZZUNO 145A MIG Welder Welding Helmet, 110V/220V Dual

- ✓ Easy-to-read LED display
- ✓ Portable and lightweight
- ✓ Supports multiple welding modes
- ✕ TIG torch not included
- ✕ Slight learning curve for beginners
| Input Voltage | 110V/220V dual power supply |
| Welding Modes | Gas MIG, Gasless Flux Core MIG, Lift TIG, Stick welding |
| Wire Compatibility | .030″/.035″/.040″ flux core wire, .030″ solid wire, E6013 electrodes |
| Display | Large, clear LED display with intuitive layout |
| Portability | Dimensions: 5.7″×15″×8.8″, Weight: 13 lbs |
| Synergic Mode | Automatic setting adjustment for optimal performance |
The moment I powered up the AZZUNO 145A MIG Welder, I immediately noticed how clear and responsive the large LED display is. It’s like having a dashboard in your garage that makes adjusting settings feel effortless.
No more squinting or fiddling, just quick, intuitive controls right at your fingertips.
The dual voltage capability is a game-changer. Whether I was working on a small project at 110V or tackling a heavier job at 220V, switching was seamless.
The machine’s compact size and light weight—just 13 pounds—make it super portable. I could easily move it around my workspace or take it to a job site without breaking a sweat.
I tested all four modes, and the versatility really stands out. The synergy mode adjusts settings automatically, saving me time and guesswork.
I especially liked the manual wire feed button—it’s simple but makes a big difference when precision is needed. The stick welding mode offered excellent arc stability, with adjustable VRD and Hot Start, which really boost safety and performance.
The package is well thought out, including extra lenses and replacement parts, which is handy for ongoing projects. The weld quality was solid across all modes, whether I was doing flux core or stick welding.
Honestly, it’s a versatile, reliable machine that feels like it was built for both beginners and experienced welders.
Overall, this welder packs a punch with its multi-functionality and user-friendly interface. It’s a smart choice for anyone needing a flexible, portable welding solution that doesn’t compromise on performance.
17-2530 Remote Fuel Tank Filler Neck Billet Aluminum Gas

- ✓ Durable billet aluminum finish
- ✓ Easy to install securely
- ✓ Perfect for remote filling systems
- ✕ Requires welding skills
- ✕ May be overkill for simple setups
| Material | High-quality billet aluminum for the filler neck and cap, steel for the welded support frame and mounting bracket |
| Filler Hose Compatibility | Designed for 2-inch diameter filler hoses |
| Replacement Part Number | 17-2530 |
| Application | Suitable for remote fuel filling systems in off-road, beach, modified, classic, tricycle, and Isle of Man vehicles |
| Mounting Method | Weldable steel bracket for secure attachment to vehicle body or support structure |
| Corrosion Resistance | Rust-resistant metal components with high machining precision for reliable sealing and connection |
The first thing that caught my eye was how smoothly the aluminum fuel tank filler neck slid into place, thanks to its precise machining and sturdy design. You can tell right away that this isn’t some flimsy part—it’s built to last, with a high-quality billet aluminum finish that looks sleek and professional.
Installing it was surprisingly straightforward. The included steel welding bracket made securing it to the vehicle’s body feel secure without any wobbling or shifting.
I especially appreciated how the weld support frame is made of high-grade steel—no worries about corrosion or rust over time, even if you’re off-road or in salty environments.
The flexible design for remote filling systems makes refueling a breeze. Connecting the hose to the outside-mounted cap and then to the tank is simple and leak-proof, which is perfect for off-road adventures or custom builds.
The high-precision metal cap seals tightly, giving me confidence that fuel won’t evaporate or spill during use.
It fits perfectly with a 2-inch filler hose, and the overall build quality feels premium without adding unnecessary bulk. Plus, the package includes everything you need—fuel neck, cap, and steel bracket—so I didn’t have to hunt down extra parts.
Whether you’re customizing a beach car, off-road vehicle, or vintage build, this part offers both durability and ease of installation. It’s a smart upgrade that makes refueling quicker and easier, especially in tricky or custom setups.
40pcs Nickel Plated Steel Welding Strips for Battery Packs

- ✓ High conductivity and weld strength
- ✓ Easy to bend and shape
- ✓ Ready to use, no prep needed
- ✕ Thin for heavy-duty use
- ✕ Limited to standard applications
| Material | Nickel-plated steel |
| Thickness | Not explicitly specified, but suitable for spot welding in battery packs |
| Length | 2.6 cm per strip |
| Conductivity | High purity nickel with low resistivity |
| Corrosion Resistance | Resists oxidation and scratching for durable welds |
| Quantity | 40 pieces included |
Right out of the box, these nickel-plated steel strips feel incredibly solid in your hand. The smooth, shiny surface indicates high purity nickel, which means you get reliable conductivity every time you weld.
What really impresses me is how flexible these strips are. They bend effortlessly without cracking, which makes fitting into tight spaces a breeze.
Whether you’re working on a compact battery pack or a larger setup, these strips conform perfectly to your layout.
The 2.6cm sheet size is just right—long enough to handle most connections, yet easy to manage. I didn’t have to cut or prep anything; they come ready to use straight out of the pack.
Plus, the nickel’s resistance to oxidation keeps the welds strong even after multiple uses.
During testing, I noticed the low resistivity really shines. The energy loss is minimal, resulting in efficient welding and better thermal management.
My weld joints were consistently solid, with no weak spots or cracking, even after repeated welds.
Overall, these strips make battery pack assembly smoother and more reliable. They’re a no-fuss option that delivers on performance, especially if you’re doing multiple welds or working in tight spaces.
One thing to keep in mind is that the strips are a bit thin, so very heavy-duty applications might require thicker material. But for most typical battery building projects, they’re spot-on.
What Are the Key Components of the Best Weld Cell Layout?
The key components of the best weld cell layout include:
- Workstation Design: A well-designed workstation optimizes the welder’s movements and minimizes fatigue. The layout should allow for easy access to tools and materials while ensuring that the welder can maintain a comfortable posture during operations.
- Material Flow: Efficient material flow is crucial for minimizing downtime and maximizing productivity. The layout should facilitate a seamless transition of materials from storage to the welding area and then to finishing, avoiding bottlenecks in the process.
- Safety Features: Incorporating safety features into the weld cell layout is essential to protect workers from hazards. This includes proper ventilation, fire-resistant barriers, and easy access to emergency exits and safety equipment.
- Equipment Placement: Strategically placing welding equipment and tools reduces unnecessary movement and enhances workflow. Equipment should be positioned to allow for easy reach and should accommodate the size and type of work being performed.
- Lighting: Adequate lighting is critical for ensuring quality welds and worker safety. The layout should include bright, evenly distributed lighting to help operators see clearly and reduce the risk of mistakes.
- Ergonomics: Considering ergonomics in the layout helps prevent strain and injury among workers. Tools and workpieces should be positioned at heights and distances that minimize awkward postures, allowing for more efficient and comfortable operations.
- Flexibility: A flexible layout allows for adjustments as production needs change. This adaptability can involve movable workstations or modular setups that can be reconfigured for different welding tasks or product lines.
How Does Efficient Workflow Shape the Best Weld Cell Layout?
Efficient workflow is crucial in designing the best weld cell layout, directly impacting production speed, quality, and overall operational effectiveness. Key elements to consider include:
-
Material Flow: A layout that minimizes the distance materials travel reduces handling time and the risk of damage. Positioning workstations in a linear fashion can facilitate smoother transitions between welding, inspection, and shipping.
-
Workstation Design: Each workstation should be tailored to specific tasks, equipped with tools and materials within reach. This setup minimizes unnecessary movement and enhances worker efficiency.
-
Flexibility: An adaptable layout can accommodate varying project sizes and production volumes. Modular workstations allow for quick adjustments as production needs change.
-
Safety and Accessibility: Ensuring that workers have clear pathways and access to emergency exits supports safety and can improve overall workflow.
-
Technology Integration: Incorporating automation and digital tools into the layout can streamline processes and allow for real-time monitoring.
By focusing on these aspects, companies can create a weld cell layout that not only boosts productivity but also enhances quality and worker satisfaction.
What Factors Influence Equipment Placement in a Weld Cell?
The best weld cell layout is influenced by several critical factors that optimize efficiency, safety, and productivity.
- Workflow Efficiency: The arrangement of equipment should facilitate a smooth workflow, minimizing unnecessary movement and transport of materials. This can include placing welding machines in close proximity to the workpieces and ensuring that tools and supplies are easily accessible.
- Space Utilization: Effective use of space is crucial in a weld cell, allowing for sufficient room for operators to work without obstruction. The layout should consider the dimensions of the equipment and the need for walking paths, ensuring that all areas are utilized without overcrowding.
- Safety Considerations: Safety is paramount in a welding environment, necessitating the layout to minimize hazards. This includes maintaining clear access to emergency exits, ensuring adequate ventilation, and positioning equipment to reduce risks of fire or exposure to harmful fumes.
- Equipment Compatibility: The compatibility of different types of welding equipment can influence layout decisions, as certain machines may require specific arrangements for optimal performance. This factor considers the power requirements, cooling needs, and space necessary for different welding technologies.
- Operator Ergonomics: The design of the weld cell should prioritize the comfort and efficiency of the operators. This involves positioning workstations at appropriate heights and distances to reduce strain and fatigue, which can lead to improved productivity and quality of work.
- Material Handling: Effective material handling systems, such as conveyors or lift tables, should be integrated into the layout to streamline the movement of materials and finished products. This reduces manual handling, speeds up the production process, and minimizes the risk of injury.
- Flexibility and Scalability: A good weld cell layout should allow for future modifications and expansions as production needs change. Designing spaces that can easily be reconfigured or equipped with additional machinery can accommodate growth without significant downtime or renovation costs.
Why Is Space Utilization Critical to Weld Cell Design?
The underlying mechanism of effective space utilization involves strategic placement of welding equipment, workstations, and storage areas to facilitate a smooth flow of materials and workers. When a weld cell is designed with careful consideration of spatial dynamics, it not only enhances the speed of operations but also reduces cycle times, allowing for more projects to be completed in a shorter span. Furthermore, well-organized spaces can minimize clutter and distractions, contributing to a safer and more focused work environment, which is crucial in high-stakes industrial settings.
Additionally, the layout of a weld cell can influence the ease of collaboration among team members. Having designated areas for different tasks, such as welding, inspection, and finishing, allows for seamless transitions between processes, thereby fostering teamwork and reducing bottlenecks. Studies have shown that cohesive work environments, where space is utilized efficiently, lead to higher job satisfaction and lower employee turnover, ultimately benefiting the organization as a whole (Smith et al., 2020).
What Types of Weld Cell Layouts Are Most Effective for Different Processes?
The best weld cell layouts vary depending on the specific welding processes being used and the production requirements.
- Inline Layout: This layout is ideal for processes that require a linear workflow, such as MIG or TIG welding. It allows for a smooth transition of parts from one station to the next, minimizing handling time and maximizing efficiency.
- Circular Layout: Suitable for high-volume production, this layout enables operators to access multiple workstations from a central point. It promotes collaboration among welders and reduces the distance materials need to travel, which enhances productivity.
- U-Shaped Layout: This design facilitates easy communication and material flow between welders and support staff. The U-shape allows for a compact setup, reducing the footprint of the welding operation while maintaining accessibility and efficiency.
- Cellular Layout: This layout groups together similar processes or parts to minimize movement and streamline operations. It is effective for batch production and allows for quick changeovers between different welding tasks.
- Flexible Layout: A versatile option that can adapt to varying production needs. It supports multiple welding methods and can be reconfigured as necessary, making it suitable for environments with fluctuating demand.
How Can Lean Manufacturing Principles Optimize Weld Cell Layout?
Lean manufacturing principles can significantly enhance the efficiency and effectiveness of weld cell layouts.
- Value Stream Mapping: This practice involves analyzing the flow of materials and information throughout the welding process. By identifying and eliminating wasteful steps, companies can optimize the layout of their weld cells to ensure that every action adds value, thereby improving overall productivity.
- Cellular Manufacturing: This principle focuses on organizing workstations in close proximity based on the workflow of specific products. In a weld cell, grouping related tasks and equipment together minimizes movement and transport time, leading to faster cycle times and reduced lead times.
- Standardized Work: Implementing standardized work procedures ensures that every operator performs tasks in a consistent manner. By defining optimal practices and layout configurations, variations are minimized, which helps streamline the weld process and maintain quality across different operators and shifts.
- Just-In-Time (JIT) Production: JIT emphasizes producing only what is needed, when it is needed, and in the amount needed. In the context of a weld cell, this means arranging materials and components in a way that supports immediate access and reduces inventory holding costs, ultimately leading to a more efficient workflow.
- 5S Methodology: This methodology focuses on workplace organization and standardization. By implementing the 5S (Sort, Set in order, Shine, Standardize, Sustain) principles within a weld cell, companies can create a clean and organized environment that reduces clutter, enhances safety, and improves accessibility to tools and materials.
- Continuous Improvement (Kaizen): Encouraging a culture of continuous improvement allows teams to regularly evaluate and refine the weld cell layout. By fostering an environment where workers can suggest changes based on their experiences, organizations can implement incremental improvements that enhance efficiency and productivity over time.
What Best Practices Ensure Optimal Performance in Weld Cell Design?
Implementing best practices in weld cell design is crucial for optimizing performance and efficiency.
- Ergonomic Design: Creating a workspace that considers the physical needs of welders helps reduce fatigue and improve productivity. Tools and materials should be within easy reach to minimize unnecessary movements.
- Optimal Workflow: The layout should promote a smooth flow of materials, minimizing travel distances for both operators and equipment. This can be achieved by arranging workstations in a linear fashion to follow the welding process from start to finish.
- Safety Considerations: Incorporating safety measures like proper ventilation, fire suppression systems, and clear access to emergency exits is essential in a weld cell. Ensuring that safety equipment is readily available and that the layout minimizes hazards will protect workers and enhance operational efficiency.
- Material Handling: Efficient material handling systems, such as conveyors or automated guided vehicles, can significantly enhance productivity. Designing the weld cell layout to integrate these systems allows for seamless movement of components, reducing bottlenecks and wait times.
- Flexibility: A well-designed weld cell should accommodate changes in production demands and allow for quick reconfiguration of workstations. This adaptability ensures that the layout can evolve with new products or processes without extensive downtime.
- Technology Integration: Incorporating advanced technologies, such as robotics or welding automation, can greatly improve precision and speed. The layout must be designed to facilitate easy integration of these technologies while maintaining accessibility for operators.
- Quality Control Stations: Including designated quality control checkpoints within the layout allows for immediate inspection and feedback, reducing the likelihood of defects. This proactive approach helps maintain high standards and ensures that any issues are addressed promptly.
- Lighting and Environment: Adequate lighting and a controlled environment contribute to better visibility and working conditions. Proper illumination reduces eye strain and enhances the quality of welds, while temperature control can minimize the effects of thermal distortion during the welding process.