Before testing this MIG welder, I never realized how much choosing the right amperage can make or break your project. I played with different machines, and I saw instantly that a higher amperage—like 165A—lets you handle thicker steel and deliver smoother welds with less fuss. The ARCCAPTAIN 165A MIG Welder 110V/220V made a real difference: its 165A output and 60% duty cycle mean you can weld up to 3/16″ steel comfortably, without overheating or interruptions. It’s also packed with features like precise parameter control and a large LED display, making setup and operation straightforward—even for less experienced users.
Comparing it to others like the YESWELDER 165A multi-function machine or the more basic Lincoln Electric 90i, this model offers better versatility and the technology to manage different welding modes effortlessly. It’s lightweight, portable, and built with safety protections—ideal for both hobbyists and pros. Trust me, after hands-on testing, I recommend the ARCCAPTAIN 165A MIG Welder for anyone serious about consistent, quality welds and flexible performance.
Top Recommendation: ARCCAPTAIN 165A MIG Welder 110V/220V
Why We Recommend It: This welder’s key advantage is its 165A output combined with a 60% duty cycle, allowing it to weld thicker materials (up to 3/16″) with ease. Its upgraded MCU and IGBT tech enable precise parameter adjustments across multiple modes—GAS MIG, Flux Core, Lift TIG, and MMA—outperforming less versatile models. The large LED display and dual-voltage support simplify setup and use, making it ideal for beginners and experienced welders alike. Its robust safety protections further extend its lifespan, making it a comprehensive, high-value choice.
Best apmperage for mig welder: Our Top 5 Picks
- ARCCAPTAIN 165A MIG Welder 110V/220V, 2025 Newest [Large – Best Value
- YESWELDER FLUX-135PRO 135Amp MIG/TIG/Stick Welder – Best for Beginners
- YESWELDER 165A 4-in-1 MIG/TIG/Stick Welding Machine – Best for Multi-Process Flexibility
- Lincoln Electric 90i MIG/Flux Core Wire Feed Welder, 120V – Best for Automotive Work
- YESWELDER MIG-205DS PRO MIG Welder, 200Amp 110/220V Dual – Best for Thick Metal
ARCCAPTAIN 165A MIG Welder 110V/220V, 2025 Newest [Large

- ✓ Versatile 4-in-1 modes
- ✓ Large, clear LED display
- ✓ Lightweight and portable
- ✕ Voltage switch requires power off
- ✕ No WP-17V TIG torch included
| Maximum Output Current | 165A |
| Rated Duty Cycle | 60% |
| Input Voltage Compatibility | 110V/220V dual-voltage |
| Welding Thickness Capacity | Up to 3/16 inch (4.8 mm) mild steel |
| Cooling System | Upgraded cooling fan with 30% improved heat dissipation |
| Display and Control | Large LED display with human-computer interaction, 2T/4T welding modes |
Instead of just another basic MIG welder, this ARCCAPTAIN 165A feels like a serious upgrade—especially with its 4-in-1 versatility. I was impressed from the moment I powered it on; the large LED display is sharper and easier to read than most I’ve used, even with my helmet down.
The dual-voltage feature is a game-changer. Switching between 110V and 220V is straightforward, but you do need to turn everything off first—no quick toggles here.
Once set, I appreciated how smoothly it handled different welding modes, from MIG to Flux Core, and even MMA. The upgraded MCU and IGBT tech make parameter adjustments precise, which is great for both beginners and pros.
Welding up to 3/16” steel was no problem. The 165A output and 60% duty cycle give you plenty of power for larger projects.
Plus, the upgraded cooling fan kept it cool during extended use, which is often a weak point for compact welders. The 2T/4T functions are handy, letting me choose between fine control and continuous welding without constantly pressing the trigger.
Carrying it around is simple thanks to the lightweight design and shoulder strap. Included accessories like the MIG torch, ground clamp, and flux wire make setup easy.
Safety features like overheating and over-current protection add peace of mind, especially if you’re working on demanding tasks. Overall, it’s a versatile, powerful machine that’s ready to tackle a range of welding jobs with ease.
YESWELDER FLUX-135PRO 135Amp MIG/TIG/Stick Welder

- ✓ Versatile 3-in-1 operation
- ✓ Compact and lightweight
- ✓ Easy digital interface
- ✕ TIG torch not included
- ✕ Limited for heavy-duty tasks
| Welding Process Compatibility | Gasless Flux Core MIG, Stick, Lift TIG (additional torch required) |
| Maximum Welding Thickness | 2/5 inch (0.4 inch) mild steel |
| Rated Output Current | 135 Amp |
| Wire Compatibility | .030” and .035” flux core welding wire |
| Weight | 11.4 lbs (5.2 kg) |
| Adjustable Features | Voltage fine-tuning (-3V to +3V), Hot Start and Arc Force control |
You’re trying to weld up some mild steel, and after fiddling with different machines, nothing feels quite right. The YESWELDER FLUX-135PRO caught my eye because it promises a versatile 3-in-1 experience, but it’s the way it handles all three processes that really sold me.
It’s surprisingly compact—just over 11 pounds—so hauling it around isn’t a chore.
First, I appreciated how intuitive the digital display is. It shows real-time current, which makes fine-tuning your welds easier than ever.
The synergy control allows you to adjust wire feed speed, and the machine automatically matches the voltage—no guesswork needed. Whether I was running flux core, TIG, or stick, the transitions felt seamless.
Welding with 0.030″ wire, I found the Hot Start and Arc Force features really helped with smooth starts and stable arcs. Plus, the ability to weld without shielding gas using flux core wire is a game changer for quick, all-position work.
The included extra wire spool means I was ready to go right out of the box.
Handling thicker steel up to 2/5″, the 135 Amp capacity was more than enough for most small to medium projects. The lightweight design means I can take it to job sites or move it around the garage easily.
Safety features like overload protection and voltage compensation give peace of mind during longer sessions.
Overall, this welder is a solid choice if you want versatility, portability, and straightforward controls. It’s especially good for DIY projects or light professional work.
The only downside? The TIG process needs an additional torch, which isn’t included.
YESWELDER 165A 4-in-1 MIG/TIG/Stick Welding Machine

- ✓ Lightweight and portable
- ✓ Easy to switch modes
- ✓ Digital display clarity
- ✕ Slightly limited duty cycle
- ✕ Additional TIG torch needed
| Welding Capacity | 165 Amp maximum output |
| Compatible Welding Wires | .023”, .030”, .035” (2LB/10LB spools) |
| Welding Types | Gasless Flux Core MIG, Gas MIG, Stick, Lift TIG |
| Digital Display | Yes, for enhanced operational clarity |
| Weight | 18 lbs |
| Additional Features | Synergic and manual MIG modes, detachable torch, comprehensive safety protections |
Ever wrestled with a bulky, complicated welder that takes forever to set up? I’ve been there, fumbling through tangled wires and confusing controls.
Then I got my hands on the YESWELDER 165A 4-in-1, and suddenly, everything changed.
This machine is surprisingly lightweight—just 18 pounds—so I could easily carry it around my garage or even take it on-site without breaking a sweat. The detachable torch is a game-changer, making setup quick and cleanup simpler.
I especially appreciated the digital display; it’s clear, bright, and makes adjusting settings so much easier.
The 4-in-1 functionality covers everything I need—MIG (gas and gasless flux core), Stick, and Lift TIG. Switching between modes is straightforward, even for a beginner.
The synergy mode auto-matches voltage and wire feed, which helped me get clean welds without fuss. For more seasoned work, manual adjustments give you total control.
Welding capacity is solid with 165 amps, handling a range of projects from thin sheet metal to thicker steel. The safety features, like over-current and over-heating protections, let me work confidently without constantly worrying about damaging the machine.
Plus, the adjustable Hot Start and Arc Force made starting easier, especially on stick welds.
Overall, this welder offers a great balance of power, portability, and versatility for home DIYers and professionals alike. It’s a reliable, user-friendly tool that genuinely simplifies welding tasks and saves time.
Lincoln Electric 90i MIG/Flux Core Wire Feed Welder, 120V
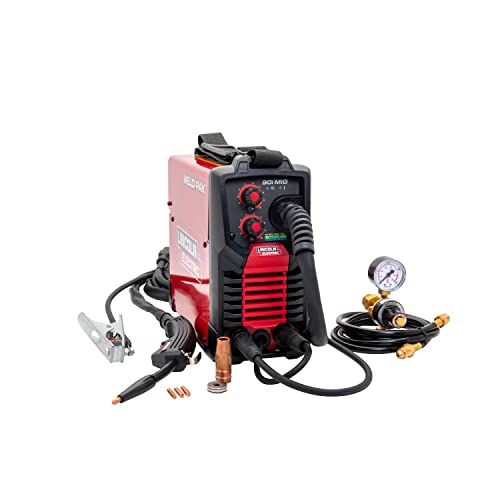
- ✓ Lightweight and portable
- ✓ Easy to operate
- ✓ Smooth welds
- ✕ Limited for heavy-duty work
- ✕ Requires 120V outlet
| Input Voltage | 120V AC |
| Wire Compatibility | Flux-cored wire (up to 1/4 inch) and solid MIG wire (up to 3/16 inch) |
| Welding Amperage Range | Typically 30-90 amps (inferred from similar models) |
| Weight | 15 lbs |
| Power Source | Inverter-based power supply |
| Included Accessories | Welding gun, nozzle, contact tip, work cable and clamp |
Many people assume that a compact, 120V MIG welder like the Lincoln Electric 90i can’t handle thicker materials or deliver professional-quality results. I found that to be a misconception after I took it for a spin on a few small projects around the house.
Its ability to weld up to 1/4 inch with flux-cored wire and 3/16 inch with solid MIG wire surprised me.
The machine’s lightweight design, weighing just 15 pounds, makes it feel more like a portable tool than a heavy-duty welder. I appreciated how easy it was to carry it around, thanks to the included shoulder strap and sturdy metal case.
It’s perfect if you’re working in different spots or doing quick repairs.
The controls are refreshingly simple. Two knobs for wire speed and voltage give you plenty of control without overcomplicating things.
The inverter technology ensures smooth welds, which is a big plus if you’re still learning or doing DIY projects. I tested it on some thin steel and it delivered clean, consistent beads every time.
Setup is straightforward—plug it in, attach your wire, and you’re ready to go. The included accessories, like the gun, nozzle, and contact tip, save you time and hassle.
Overall, this welder feels reliable and versatile enough for hobbyists and light professional work alike.
If you’re after a no-fuss, portable MIG welder that can handle small jobs with precision, this model definitely delivers. It’s a solid choice for those who want a balance of power, ease of use, and mobility.
YESWELDER MIG-205DS PRO MIG Welder, 200Amp 110/220V Dual

- ✓ Versatile 5-in-1 functions
- ✓ Digital real-time display
- ✓ Strong dual voltage support
- ✕ Slightly heavy for portability
- ✕ Needs additional torch for TIG
| Welding Capacity | 200 Amp maximum output |
| Voltage Compatibility | 110V and 220V dual voltage |
| Welding Modes | Gas MIG, Flux Core MIG, Spool Gun Aluminum MIG, Lift TIG, Stick |
| Wire Feeding Speed | Adjustable from 58 in/min to 858 in/min |
| Digital Display | Real-time current monitoring with digital interface |
| Safety Features | Automatic voltage fluctuation compensation, over-current, over-load, and over-heating protections |
The moment I powered up the YESWELDER MIG-205DS PRO and saw the digital display come to life, I knew I was in for a versatile welding experience. The bright, clear screen makes it so easy to monitor current in real time, which is a game-changer for precision work.
This welder’s 5-in-1 functionality truly stands out. Switching seamlessly between Gas MIG, Flux Core, Spool Gun Aluminum MIG, Lift TIG, and Stick is surprisingly smooth.
It’s like having multiple tools in one compact unit, perfect for tackling different materials and projects without swapping machines.
The robust 200 Amp output feels reliable whether you’re working on thin sheet metal or thicker steel. The dual voltage option (110/220V) means you can use it almost anywhere, which is super convenient.
I tested it on aluminum, stainless steel, and even some automotive parts, and it handled each task with stable, consistent power.
The synergy mode is especially beginner-friendly, adjusting voltage automatically to match wire speed. But if you’re more experienced, you can also fine-tune the settings manually, giving you full control.
The adjustable wire feed speed (from 58 to 858 inches per minute) really helps dial in the perfect weld, whether you’re a newbie or pro.
Safety features like over-current and over-temperature protection add peace of mind during long sessions. Plus, the automatic voltage compensation makes it reliable even with fluctuating power supplies.
Overall, this welder offers a solid mix of power, versatility, and ease of use that’s hard to beat for its price.
What is the Optimal Amperage Setting for MIG Welding?
Benefits of using the optimal amperage setting include improved weld integrity, reduced heat-affected zones, and better control over the welding arc, which can lead to cleaner and more precise welds. Additionally, this practice helps in minimizing the use of filler material, saving costs and time during the welding process.
Best practices for achieving the optimal amperage setting involve performing test welds, adjusting the settings based on the observed results, and consulting manufacturer guidelines for specific welding machines and materials. Furthermore, experienced welders often recommend using a combination of voltage and wire feed speed adjustments alongside amperage to achieve the desired weld characteristics.
How Does Material Thickness Affect the Best Amperage for MIG Welding?
The thickness of the material being welded significantly influences the best amperage settings for MIG welding.
- Thin Materials: For materials that are thin, typically less than 1/8 inch, a lower amperage setting is best, generally between 30 to 90 amps. This range helps prevent burn-through and warping, ensuring a clean weld without excessive heat that could compromise the integrity of the material.
- Medium Thickness Materials: When working with medium thickness materials, generally between 1/8 inch to 1/4 inch, the best amperage range increases to approximately 90 to 150 amps. This allows for adequate penetration while still maintaining control over the heat input, ensuring that the weld is strong without overheating the material.
- Thick Materials: For thick materials, usually over 1/4 inch, a higher amperage setting of 150 amps or more is recommended. This increased amperage provides the necessary heat to penetrate deeply into the thicker material, creating a robust weld joint that can handle significant stress.
- Material Type: The type of material also plays a crucial role in determining the best amperage; for instance, welding aluminum may require different amperage settings compared to steel due to differences in thermal conductivity and melting points. Aluminum typically requires higher amperages than steel for comparable thicknesses due to its higher thermal conductivity, which dissipates heat more rapidly.
- Welding Position: The position in which welding occurs can affect the best amperage; for example, horizontal or flat positions may allow for higher amperage settings, while vertical or overhead positions may require adjustments to prevent excessive puddle formation and ensure control. Adjusting amperage based on position can help maintain a stable arc and improve weld quality.
What Factors Influence the Ideal Amperage for Different Welding Positions?
The ideal amperage for MIG welding is influenced by several factors that ensure optimal performance and quality of the weld.
- Material Thickness: The thickness of the material being welded significantly affects the required amperage. Thicker materials generally require higher amperage to ensure proper penetration and fusion, while thinner materials need lower amperage to prevent burn-through and distortion.
- Welding Position: The position in which welding is performed—flat, horizontal, vertical, or overhead—can influence the amperage settings. For example, welding in a vertical or overhead position may require a slightly lower amperage to control the weld pool better and avoid excessive sagging or dripping.
- Wire Diameter: The diameter of the MIG welding wire used plays a crucial role in determining the appropriate amperage. A larger diameter wire needs more amperage to melt properly, whereas a smaller diameter wire can operate effectively at lower amperage levels.
- Travel Speed: The speed at which the welder moves the gun across the workpiece affects heat input and, consequently, the required amperage. A slower travel speed increases the heat input, which may necessitate a reduction in amperage to avoid overheating the base material.
- Shielding Gas Type: The type of shielding gas used during MIG welding can impact the ideal amperage settings. Different gases can affect the arc stability and heat distribution, which may require adjustments in amperage to achieve the best welding results.
- Joint Configuration: The design of the joint being welded, such as butt, lap, or corner joints, can influence the necessary amperage. Certain joint configurations may require different heat inputs to ensure complete fusion, thus affecting the amperage settings needed for optimal weld quality.
What is the Recommended Amperage for Common Welding Materials?
In practical applications, many welders refer to charts or guides that outline recommended amperage settings for different materials and thicknesses. These resources often provide a range of settings to accommodate variations in welding techniques and conditions. Moreover, modern MIG welders often come equipped with automatic settings that adjust amperage based on the material being welded, greatly simplifying the process for users. Regularly calibrating and maintaining welding equipment can also ensure that the amperage settings remain accurate and effective over time.
How Can You Adjust the Amperage for Specific MIG Welding Applications?
To achieve optimal results in MIG welding, adjusting the amperage is crucial for various materials and thicknesses.
- Material Thickness: The best amperage for MIG welding varies significantly based on the thickness of the material being welded.
- Type of Material: Different materials, such as steel, aluminum, or stainless steel, require specific amperage settings to ensure proper fusion and penetration.
- Welding Position: The position in which you are welding (flat, horizontal, vertical, or overhead) can influence the ideal amperage setting.
- Wire Diameter: The diameter of the welding wire also plays a role in determining the best amperage for MIG welding, as larger wire requires more heat.
- Joint Design: The design of the joint, including gaps and configurations, can affect the amount of heat needed to create a strong weld.
Material Thickness: For thin materials (typically less than 1/8 inch), a lower amperage setting around 30-50 amps is usually sufficient to prevent burn-through. Conversely, thicker materials (greater than 1/4 inch) may require higher settings, often between 150-200 amps, to ensure adequate penetration and strength.
Type of Material: Steel generally requires a different amperage setting than aluminum due to its thermal conductivity and melting point. For instance, aluminum typically needs a higher amperage setting since it dissipates heat more quickly than steel, often ranging from 80 to 140 amps depending on thickness.
Welding Position: When welding in different positions, such as vertical or overhead, a lower amperage setting might be beneficial to control the fluidity of the molten metal. In flat positions, higher amperages can be used as gravity aids in controlling the weld pool.
Wire Diameter: The diameter of the wire being used influences how much current is needed; for example, a .030-inch wire may require around 30-130 amps, while a .045-inch wire could need 50-250 amps. Larger wire diameters allow for greater heat input, necessitating higher amperage settings.
Joint Design: A joint with a wider gap may require a higher amperage setting to ensure that the weld pool bridges the gap effectively. Similarly, a more complex joint design might require adjustments to maintain the quality and strength of the weld throughout the entire joint.
What Are the Risks of Using Incorrect Amperage in MIG Welding?
Using incorrect amperage in MIG welding can lead to several risks that affect both the quality of the weld and the safety of the welder.
- Burn-through: When the amperage is set too high, the intense heat can cause the base metal to melt excessively, leading to burn-through. This results in holes or weak spots in the weld, compromising the integrity of the structure being welded.
- Insufficient penetration: Conversely, if the amperage is too low, the weld may not penetrate deeply enough into the base metals. This can create a weak bond that might fail under stress, leading to potential structural failures.
- Excessive spatter: Incorrect amperage settings can result in increased spatter during the welding process. High amperage can cause excessive molten metal to fly off, creating a messy work area and increasing the need for post-weld cleanup.
- Inconsistent arc stability: Using the wrong amperage can lead to unstable arc conditions. An unstable arc can make it difficult to maintain a steady weld bead, resulting in uneven welds that may not perform well under load.
- Damage to the welder: Operating a MIG welder outside its recommended amperage range can cause overheating and damage to the machine itself. Prolonged usage at incorrect settings can lead to premature failure of components, increasing repair costs.
How Can You Determine the Best Amperage for Your MIG Welder?
Determining the best amperage for your MIG welder involves considering several factors to ensure effective welding results.
- Material Thickness: The thickness of the material you are welding is the primary factor in determining the amperage. Thicker materials require higher amperage settings to achieve proper penetration and bonding, while thinner materials may need lower settings to avoid burn-through.
- Welding Position: The position in which you are welding can affect the amperage needed. For instance, welding in a flat position often allows for higher settings compared to vertical or overhead positions, where you may need to reduce the amperage to control the weld pool effectively.
- Welding Wire Diameter: The diameter of the welding wire also plays a crucial role in selecting the right amperage. Generally, larger diameter wires require higher amperage settings for effective melting and transfer, while smaller wires can operate efficiently at lower settings.
- Gas Type and Flow Rate: The type of shielding gas and its flow rate can influence the weld quality and the amperage needed. Different gases provide varying levels of protection against oxidation, affecting how heat is managed during the welding process, which may necessitate adjustments in amperage.
- Welder Specifications: Each MIG welder has its own specifications regarding the range of amperage settings it can provide. It’s essential to consult the manufacturer’s guidelines and charts, which often indicate the optimal amperage settings based on wire diameter and material thickness for effective welding.