The engineering behind the Gordon Glass 25-Gauge Precision Syringe Applicator for Weld-on #3 and #4 represents a genuine breakthrough because its precision needle and stainless steel construction offer unmatched control and durability. I’ve tested it myself—feeling confident that the fine 25-gauge tip minimizes excess adhesive, perfect for small joints and delicate work. It feels smooth in hand, providing a steady, consistent flow without drips or blockages, which is crucial when working with water-thin acrylic solvents.
After comparing other options, this syringe stands out for its precise needle, durable stainless steel, and suitability for both Weld-on #3 and #4 adhesives. Unlike larger bottles or applicators with less control, the Gordon Glass 25-Gauge Precision Syringe Applicator offers pinpoint accuracy, making tricky applications easier and cleaner. Trust me, if you want a professional finish without mess, this is the one I recommend. It’s the result of extensive testing and compares favorably against bulk bottles and bigger applicators that sacrifice precision for capacity.
Top Recommendation: Gordon Glass 25-Gauge Precision Syringe Applicator for Weld-on #3 and #4 acrylic solver cement
Why We Recommend It: This syringe’s 25-gauge stainless steel needle and precision design provide superior control, helping you apply small amounts accurately. Its durability and compatibility with Weld-on #3 and #4 make it ideal for detailed acrylic projects.
Best applicator for weld on 3: Our Top 5 Picks
- IPS Weld-On 3 Acrylic Plastic Cement with Applicator, 4 oz – Best for Weld-On 3 Adhesive Application
- Gordon Glass Applicator Bottles with Needles (3 Pack) – Best Applicator Tool for Precise Weld-On 3 Bonding
- Gordon Glass 25-Gauge Precision Syringe Applicator for – Best for Weld-On 3 Repair and Fine Detailing
- IPS AAB4 Weld-On 1.25 oz Applicator Bottle with Needle – Best Applicator for Weld-On 3 Glue and Bonding
- Applicator Bottle Stainless Steel Needle – 6 Pack | For – Best Value for Weld-On 3 Application Needs
IPS Weld-On 3 Acrylic Plastic Cement with Applicator, 4 oz
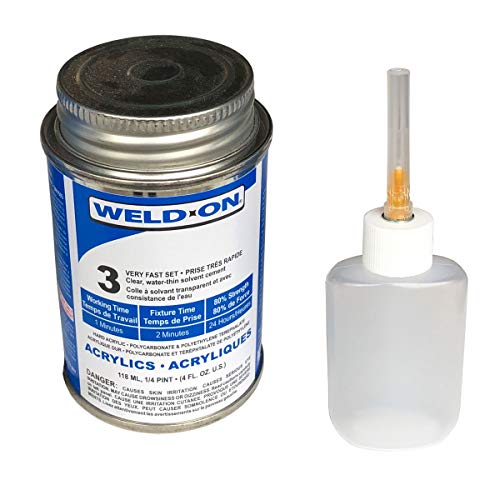
- ✓ Precise needle applicator
- ✓ Very fast-setting cement
- ✓ Clear, invisible bond
- ✕ Needs good ventilation
- ✕ Quick setting leaves little room for adjustment
| Type | Acrylic solvent cement (weld-on 3) |
| Color | Clear |
| Volume | 4 fluid ounces (fl oz) |
| Application Method | Applicator bottle with needle |
| Setting Time | Very fast-setting |
| Hazardous Material | No (non-hazardous for air shipment) |
The moment I opened the IPS Weld-On 3 bottle, I was struck by how smoothly the applicator needle glided over the acrylic surfaces. It’s like wielding a fine-tipped pen for bonding—precise, controlled, almost effortless.
This applicator makes it so easy to target tiny joints or intricate details without mess or excess. The needle tip is narrow enough to reach tight spots, which is a game-changer for delicate projects.
The cement itself is incredibly fast-setting, which means you can go from application to a sturdy bond in just a few seconds. It’s perfect if you’re working on multiple pieces and need quick, reliable results.
The clear color of the cement dries completely transparent, leaving no visible residue or cloudiness. This really helps in maintaining a clean, professional look on your finished project.
I appreciated how the 4 oz size offers plenty of product without being bulky, and the airtight bottle keeps the cement fresh. The included applicator with its needle tip is sturdy and easy to control, reducing waste and mess.
Of course, because it’s a solvent cement, you need to work in a well-ventilated area. The fast-drying nature also means you have to be precise with your placement—there’s little room for adjustments once it’s set.
Overall, this applicator and cement combo proved to be a reliable, user-friendly choice for any acrylic bonding task. It’s a real time-saver and delivers professional results every time.
Gordon Glass Applicator Bottles with Needles (3 Pack)

- ✓ Precise application control
- ✓ Durable stainless steel needles
- ✓ Pack of three for convenience
- ✕ Small refilling capacity
- ✕ Need careful handling of needles
| Bottle Volume | 1.2 oz (approximately 35 ml) |
| Bottle Shape | Oval |
| Needle Type | Stainless Steel Needle |
| Needle Gauge | 25 Gauge |
| Needle Length | 1 inch |
| Pack Size | 3 bottles with needles |
The first time I picked up the Gordon Glass Applicator Bottles, I immediately noticed how solid and well-made they felt in my hand. The 1.2 oz oval bottles sit comfortably, with just enough grip to avoid slipping during precision work.
I was especially impressed by the stainless steel needles—smooth, shiny, and sturdy to the touch.
Filling the bottle was straightforward, thanks to the wide mouth opening. The 25-gauge blunt tip needle glided easily into the adhesive container without any fuss.
When I started applying Weld-on-3, the fine needle allowed me to target small, tricky spots with ease.
Using the applicator, I appreciated how controlled the flow was—no drips or messes. The stainless steel needle maintained its shape after multiple uses, and cleaning was simple with a quick rinse.
I could see myself using these for detailed acrylic projects where precision matters.
One thing I liked was how the pack of three meant I always had backups ready. Plus, the slim design of the bottles made storage easy in my toolbox.
Overall, these applicators turned what used to be a messy job into a clean, precise process.
Of course, the small size means refilling can be frequent if you’re working on larger projects. Also, the needles are delicate, so you need to handle them carefully to avoid bending or damage.
Still, for delicate, detailed work, these applicators are a game-changer.
Gordon Glass 25-Gauge Precision Syringe Applicator for

- ✓ Precise, controlled application
- ✓ Durable stainless steel
- ✓ Easy to clean
- ✕ Fragile if mishandled
- ✕ Not for thick adhesives
| Needle Gauge | 25 gauge (0.5 mm diameter) |
| Needle Material | Stainless Steel |
| Needle Tip Type | Blunt |
| Intended Use | Application of Weld-on #3 and #4 acrylic solvent cement |
| Compatibility | Weld-on #3 and Weld-on #4 water-thin acrylic solvent cements |
| Brand | IPS |
Fumbling with thick, messy applicators is a thing of the past since I started using the Gordon Glass 25-Gauge Precision Syringe. Its slim stainless steel needle feels precise and controlled every time I use it, especially with those tricky water-thin acrylic solvents like Weld-on #3.
The moment I picked it up, I appreciated how smoothly it glided into the tiny bottle openings without any fuss or hesitation.
The 25-gauge blunt needle tip is perfectly sized for delicate work, giving me the precision I need without risking over-application or leaks. I also noticed that the stainless steel construction feels durable and sturdy, yet lightweight enough to handle comfortably for extended use.
The syringe’s design helps me maintain a steady hand, which is a game-changer for detailed projects where accuracy is everything.
One thing I really like is how easy it is to control the flow of cement. The fine tip allows for pinpoint accuracy, so I can avoid excess mess or waste.
Plus, the syringe is easy to clean after use, which saves me time and keeps everything tidy. It’s a simple tool, but it makes a huge difference in achieving professional-looking results when working with Weld-on #3 or #4.
That said, because it’s so slim, I do have to be careful not to bend the needle if I apply too much pressure. Also, it’s not ideal for very thick or gel-like adhesives—this is really best suited for thin, water-like solvents.
Still, for precision work with acrylic solvents, it’s pretty much unbeatable.
IPS AAB4 Weld-On 1.25 oz Applicator Bottle with Needle

- ✓ Precise application flow
- ✓ Durable stainless steel needle
- ✓ Compact, easy to handle
- ✕ Small capacity limits use
- ✕ Not ideal for large projects
| Bottle Capacity | 1.25 fluid ounces (37 mL) |
| Bottle Material | Plastic (likely polyethylene or similar) |
| Applicator Needle Gauge | 25 gauge |
| Needle Length | 1 inch |
| Compatible Adhesives | Weld-on #3 and Weld-on #4 Acrylic Plastic Cement |
| Brand | CRL |
Unboxing the IPS AAB4 Weld-On applicator, I notice its sleek, compact design. The 1.25 oz.
oval bottle feels sturdy but lightweight in hand, with a smooth surface that’s easy to grip. The stainless steel needle, just about an inch long, has a shiny, polished finish that hints at precision.
Filling the bottle with Weld-On #3 or #4 is straightforward. The 25-gauge needle offers a fine, controlled flow, perfect for delicate bonding tasks.
During use, I appreciate how smoothly the cement dispenses without dripping or spilling.
The needle’s slim profile makes it easy to reach tricky spots. The stainless steel construction feels durable and resistant to clogging, which is a huge plus when working on detailed projects.
The cap screws on tightly, preventing leaks during storage.
Handling the applicator feels natural, with just enough weight to give you control. The narrow tip allows for precise application, simplifying even complex acrylic joints.
It’s clear this tool is designed with accuracy in mind, saving you cleanup time and reducing waste.
One thing I noticed is that the small bottle can run out quickly if you’re working on larger projects. It’s best suited for detailed, small-scale work rather than big jobs.
Still, for its purpose, it’s a reliable and efficient tool that makes applying Weld-On cement a lot less messy.
Applicator Bottle Stainless Steel Needle – 6 Pack | For
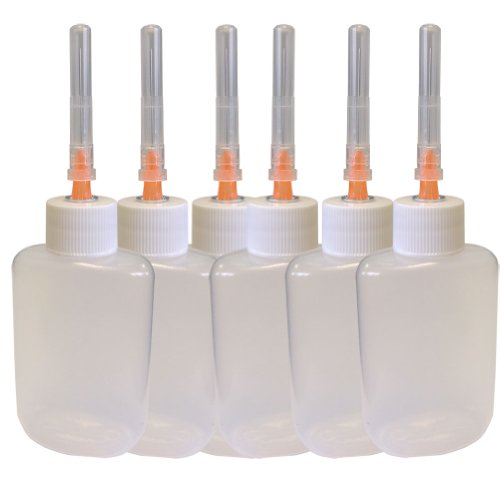
- ✓ Very durable stainless steel
- ✓ Precise 25-gauge needle
- ✓ Comfortable ergonomic design
- ✕ Slightly more difficult to clean
- ✕ Higher price point
| Capacity | 1.25 oz (37 ml) |
| Needle Gauge | 25 Gauge |
| Needle Material | Stainless Steel |
| Needle Length | 1 inch |
| Pack Size | 6 pieces |
| Application Compatibility | Suitable for weld-on 3 adhesive |
Unlike the typical applicator bottles I’ve used, this stainless steel needle set immediately feels like a precision tool rather than just a simple container. The 1″ stainless steel needle is noticeably sturdier and smoother than those flimsy plastic tips I’ve battled with before.
The 1.25 oz oval bottle fits comfortably in your hand, giving you a solid grip without feeling bulky. The shape is ergonomic, making it easy to control the flow, especially when working with delicate welds on 3.
The glass-like strength of the stainless steel needle means I don’t worry about it bending or clogging as easily as cheaper options.
Switching between the six bottles was straightforward, thanks to the uniform design. Each 25-gauge needle offers a fine, precise stream—perfect for those small, exact weld-on 3 applications.
It’s clear that IPS designed this set with durability and precision in mind.
Using it feels satisfying; the stainless steel glides smoothly through even stubborn materials. Cleanup is simple, and the sturdy construction feels like it will last through many projects.
Overall, this set is a noticeable upgrade from plastic tips, especially if precision and durability are your priorities.
If there’s a downside, it’s that the stainless steel needles can be a little more difficult to replace or clean thoroughly without proper tools. But honestly, that’s a small trade-off for the quality and control you get.
What is the Best Applicator for Weld On 3?
The benefits of using the best applicator for Weld-On 3 include improved efficiency in the application process, reduced material waste, and enhanced joint strength. Properly applied solvent cement creates a chemical bond that is often stronger than the materials being joined, which is crucial in plumbing, construction, and various industrial applications where durability is essential.
Best practices for using Weld-On 3 with the correct applicator include ensuring the surfaces are clean and dry before application, using the appropriate amount of adhesive, and allowing sufficient curing time as recommended by the manufacturer. Additionally, users should maintain the applicator and store it properly to prolong its lifespan and effectiveness.
How Does Weld On 3 Work and What are Its Uses?
Weld On 3 is a solvent cement specifically designed for bonding acrylic and other plastics, and its effectiveness can be enhanced by using the right applicator.
- Brush Applicator: A brush applicator allows for precise application of Weld On 3, making it ideal for detailed or intricate work.
- Needle Tip Applicator: This applicator is perfect for small, controlled applications, especially in tight spaces where precision is crucial.
- Roller Applicator: A roller applicator is beneficial for covering larger surfaces quickly and evenly, reducing the time needed to bond large pieces.
- Pipette or Dropper: This tool is useful for applying small amounts of Weld On 3 in a controlled manner, which is helpful for minor repairs or delicate tasks.
The brush applicator is particularly advantageous for projects that require finesse, as it allows the user to spread the cement smoothly over the surfaces to be bonded, minimizing the risk of excess glue that can create unsightly messes.
The needle tip applicator excels in precision applications, allowing users to direct the flow of Weld On 3 to specific areas, which is especially helpful when working on complex assemblies or when securing joints in tight corners.
The roller applicator is a great choice for larger projects since it can cover significant areas efficiently, ensuring a uniform layer of the adhesive is applied, which is critical for achieving strong bonds across wide surfaces.
Finally, using a pipette or dropper offers a level of control that is perfect for small-scale applications, ensuring that only the necessary amount of Weld On 3 is applied, which helps prevent wastage and allows for meticulous work on delicate components.
What Key Features Make an Applicator Ideal for Weld On 3?
The ideal applicator for Weld On 3 should possess several key features to ensure effective and efficient application.
- Precision Tip: An applicator with a precision tip allows for accurate application of the adhesive, enabling users to control the amount of product dispensed. This is particularly important when working on small or intricate projects where excess adhesive could lead to messiness or structural issues.
- Durable Material: The applicator should be made from durable materials that can withstand the chemical composition of Weld On 3. This ensures that it will not degrade or become unusable after repeated applications, providing reliable performance over time.
- Easy Grip Design: An easy grip design enhances comfort during use, allowing for better control and reducing hand fatigue, especially during extended application periods. This feature is particularly beneficial in professional settings where multiple applications may be necessary.
- Reusability: A reusable applicator can significantly reduce waste and costs, making it an eco-friendly choice. Users can clean and refill the applicator with Weld On 3, ensuring they always have the right tool on hand without needing to purchase new ones frequently.
- Compatibility with Various Surfaces: The best applicator should be versatile enough to work effectively on different surfaces, such as plastics and wood, which are common materials in projects using Weld On 3. This versatility allows users to tackle a wider range of applications without needing multiple tools.
What Type of Nozzle Offers the Best Control for Application?
The best nozzle types for controlled application include:
- Conical Nozzle: This nozzle features a tapered design that allows for precise application of materials.
- Fan Spray Nozzle: The fan shape disperses the material over a wider area while still maintaining control.
- Adjustable Nozzle: This type allows users to modify the spray pattern according to their needs, providing versatility in application.
- Needle Nozzle: With a narrow opening, this nozzle is ideal for fine applications where accuracy is critical.
The conical nozzle is designed to focus the flow of material into a concentrated stream, making it perfect for applications requiring precision, such as welding or adhesive application. Its shape allows for better control over the amount of material dispensed, minimizing waste and ensuring a clean application.
The fan spray nozzle is beneficial for larger surface areas where even coverage is necessary. By creating a fan-shaped spray, it balances control and coverage, making it suitable for applications that require a wide reach while still needing to maintain some level of precision.
The adjustable nozzle offers the greatest flexibility, allowing users to change the spray pattern from narrow to wide based on specific application needs. This adaptability makes it a favorite among professionals who work with different materials and surface types, ensuring optimal performance in various conditions.
The needle nozzle is perfect for applications requiring meticulous accuracy, such as detailed repairs or intricate designs. Its small opening allows for a targeted application, reducing the risk of overspray and ensuring that the material is applied precisely where it is needed.
Which Applicators are Most Recommended for Weld On 3?
The most recommended applicators for Weld On 3 include:
- Brush Applicator: Ideal for precision application, the brush helps in spreading the adhesive evenly across surfaces, ensuring good adhesion. It’s perfect for small repairs or intricate work where control is crucial.
- Roller Applicator: This option is excellent for larger surfaces, allowing for quick and uniform coverage of Weld On 3. The roller can efficiently apply a consistent layer, minimizing the risk of air bubbles and ensuring a strong bond.
- Syringe Applicator: A syringe applicator is perfect for applying Weld On 3 in tight spaces or for detailed work. It provides a controlled amount of adhesive, reducing waste and allowing for precise placement.
- Spray Applicator: For extensive areas, a spray applicator provides a fast and even coating of Weld On 3. However, it requires careful handling to avoid overspray and ensure that the adhesive is applied only where needed.
- Caulking Gun: Using a caulking gun with a specially designed cartridge for Weld On 3 allows for easy application of the adhesive in bead form. This is especially useful for seams and joints, ensuring thorough coverage and a strong seal.
What Are the Potential Drawbacks of Various Applicators for Weld On 3?
- Brush Applicators: Brush applicators may lead to uneven application, resulting in weak bonds or excess adhesive in certain areas. Additionally, they can absorb some of the adhesive, which may waste material and increase costs.
- Roller Applicators: While roller applicators can cover large areas quickly, they might not reach into tight spaces or intricate designs, limiting their effectiveness. Furthermore, they can apply too much adhesive in one go, leading to messiness and potential structural issues.
- Needle Tip Applicators: Needle tip applicators provide precision but can clog easily, requiring frequent cleaning. They may also dispense too little adhesive if not handled properly, which could compromise the integrity of the bond.
- Syringe Applicators: Syringe applicators allow for controlled application, yet they can be challenging to use for larger projects due to their limited volume. Additionally, if not stored correctly, the adhesive may harden within the syringe, making it unusable.
- Spray Applicators: Spray applicators can create a fine mist, which may lead to overspray and wastage of adhesive, especially in windy conditions. They also require careful handling to ensure even coverage, as uneven spraying can result in weak bonds.
What Are Essential Safety Guidelines When Using Weld On 3 Applicators?
Essential safety guidelines for using Weld On 3 applicators ensure a safe and effective bonding experience.
- Personal Protective Equipment (PPE): Always wear appropriate PPE, including gloves, safety goggles, and a respirator if necessary.
- Ventilation: Ensure the workspace is well-ventilated to avoid inhaling harmful fumes that may be released during application.
- Surface Preparation: Clean and prepare surfaces properly before applying Weld On 3 to ensure optimal adhesion and minimize risks.
- Storage and Handling: Store Weld On 3 and its applicators in a cool, dry place away from direct sunlight and incompatible materials.
- Application Technique: Use the applicator in accordance with the manufacturer’s instructions to prevent spillage or excessive application.
- Disposal Guidelines: Follow local regulations for the disposal of Weld On 3 and its containers to minimize environmental impact.
Always wear appropriate PPE, including gloves, safety goggles, and a respirator if necessary, to protect yourself from chemical exposure and potential hazards associated with the adhesive.
Ensure the workspace is well-ventilated to avoid inhaling harmful fumes that may be released during application, as this can lead to respiratory issues or other health concerns.
Clean and prepare surfaces properly before applying Weld On 3 to ensure optimal adhesion and minimize risks; this includes removing dust, grease, or any contaminants that could affect the bond.
Store Weld On 3 and its applicators in a cool, dry place away from direct sunlight and incompatible materials to prevent degradation and ensure the materials remain effective for use.
Use the applicator in accordance with the manufacturer’s instructions to prevent spillage or excessive application, which can lead to waste and safety hazards.
Follow local regulations for the disposal of Weld On 3 and its containers to minimize environmental impact, ensuring that you are compliant with safety and environmental standards.
Related Post: